Showing posts with label peeling. Show all posts

Wednesday, September 12, 2012

Success 2 - Its' Nuts!

In May I blogged how I built an enhanced copy of Oskar van Deventer's Cooksey Tribute D puzzle.  Oskar already owned a copy of Cooksey Tribute D, and so did I, so Oskar suggested I send the third as a gift to Jerry Slocum, a renowned puzzle enthusiast and author.

Coincidentally two other puzzle enthusiasts, John Rausch and Tyler Barrett, had recently persuaded me to build a small quantity of bolts with trick nuts like the ones in my Wrong Way Nut video so I chose to send one to Jerry.  That way Cooksey Tribute D would be a gift from Oskar, and Wrong Way Nut could be a gift from me.

For reference, here's the Wrong Way Nut video:

Jerry telephoned me immediately after he'd received the puzzles and asked if I could possibly build 120 copies of the bolt and nuts for the Puzzle Party.  I was thrilled!

We agreed the puzzle needed a name because I had originally adopted "wrong way nut" as a descriptive phrase, not an actual title.  Jerry researched to ensure we wouldn't infringe any trademarks.  I liked his suggestion Its' Nuts because it used an apostrophe in a nonstandard way, which was a subtle puzzle in itself.  Had it been intended as the contraction It's Nuts or a possessive term Its Nuts?

Each nut is embossed with "Its'" on one side and "Nuts" inverted on its opposite side so the puzzle's title appears when the nuts are correctly threaded onto the bolt.  Can you work out the probability of correctly assembling the bolt and its nuts so they say Its' Nuts?  (It's not just 1 in 2, as you might guess.)

It's customary for entries in the Edward Hordern IPP Puzzle Exchange to carry the name of the person exchanging them and the date of the IPP event when they were exchanged.  The bolts I built for Jerry are custom-embossed with IPP32 and the year 2012 on one face, and From Jerry Slocum on an opposite face.

With Jerry's approval, I added my own name to the top of the bolt head to identify myself as the creator.  Pay attention to how thin those letters really are, forming narrow strokes less than 1mm thick.

I deliberately made those hollow areas are narrower than 1mm so they wouldn't be sufficiently wide for the SD300 to apply anti-glue inside those narrow channels.  Consequently the letters are glued into the solid bolt head when the SD300 builds them, forming subtle outlines that can only be read by carefully examining the sheen of the top surface.

Screw threads need a slick finish, but the SD300 ordinarily builds layers with sharply-defined edges so I dipped every single nut and bolt in Weld-On 2007.


The solvent smooths and seals the layers, but after a few uses the solvent also tends to fog up the glossy top surface--an undesirable side effect.  To avoid fogging I learned how to dip the bolt only up to the sides of the hex-shaped head, but that left the side walls of the bolt head with a half-glossy/half-matte appearance.  The solution?  I wiped the side walls with ordinary PVC Pipe Primer from my local plumbing supply--it contains just enough solvents to impart a uniformly glossy appearance, and it includes a neat applicator.

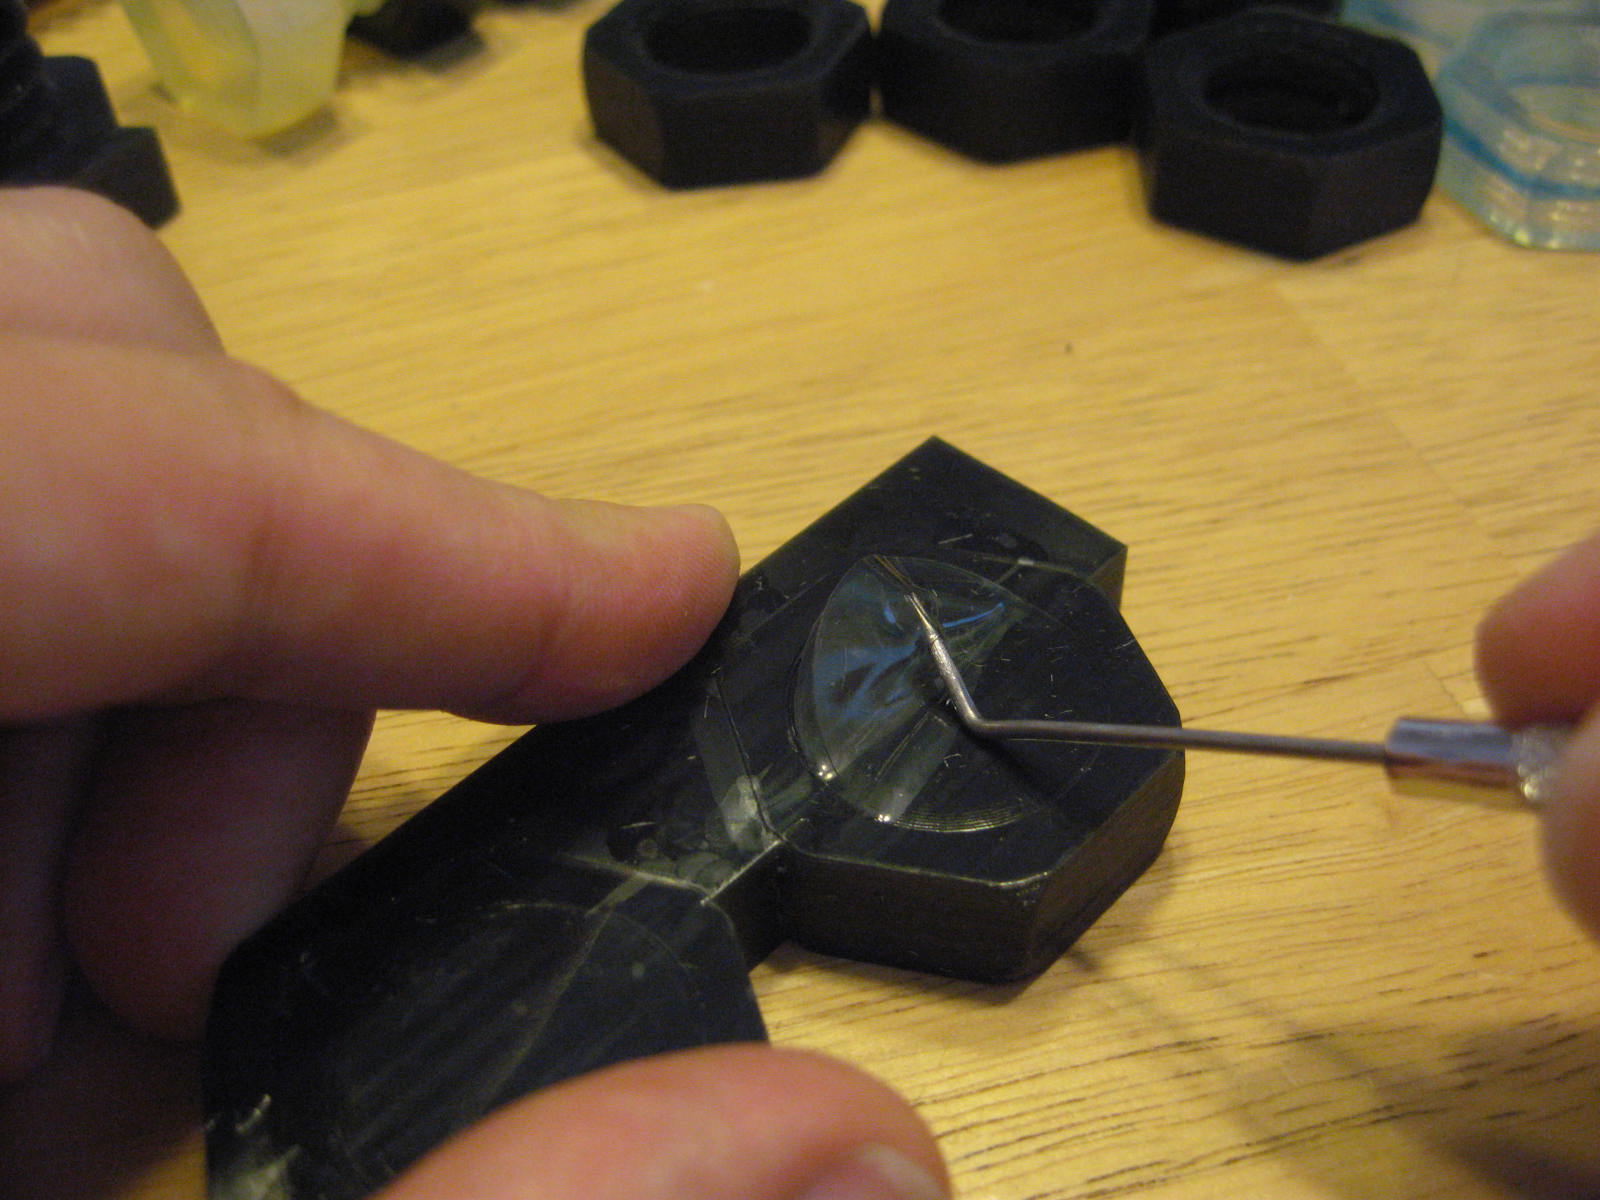
This was a big project.  It took over a week to build all those bolts, and almost two weeks more to build all the nuts.  The nuts were more trouble than the bolts because I had to manually clear 72 layers of leftover support material from the center of each nut, tearing out the layers with a pointed probe as illustrated in this previous blog post.  It went at least twice as fast if I heated the model in my microwave oven for 30 seconds, a tip I learned from Jason Harris.

After the various pieces had been built, I assembled them into completed Its' Nuts sets.

I vacuum packed the bolt sets in groups for convenient shipping to Jerry.

For their final presentation Jerry repackaged Its' Nuts into individual prescription-drug containers, playfully labeled Slocum Pharmacy.  It included a caution, "Be sure to take with 1 grain of salt."

Jerry Slocum increased his order to 135 sets of Its' Nuts and I managed to build all 135 of them without any rejects or second-quality parts.  I sent him every single bolt I had built with the custom "From Jerry Slocum" inscription, and I forgot to keep one for myself!  I'm happy to build more bolts, but I wouldn't allow myself to build any more of Jerry's bolts--I regard them as a work-for-hire.

So I negotiated a puzzle-swap: he traded me one of the customized IPP bolts and in exchange I gave him this one-of-a-kind bolt that was professionally built via SLA, polished, and lacquered by a professional bureau.  To commemorate the occasion, I paired it with the very first nuts that had ever been inscribed with Its' Nuts.


Epilogue...
Jerry Slocum won me over to the name Its' Nuts because the odd placement of the apostrophe struck me as a clever piece of word-play.  He later confessed that it originated as a typo.

Friday, April 13, 2012

Fluctuating Build Economy

I've produced a ton of test models for my Cooksey's Griddle puzzle of the past month because I discovered how to build them cheaply with relative ease.  That's quite a change from my experience in February, when I had so much trouble building prototypes of it that I gave up and submitted the model to i.Materialise to build it for me--but they couldn't build it either.  (Bad STL file, I think.)

But I didn't really set out to build so many test models, it just happened.  The first model worked fine but someone suggested a nice improvement so I built another.  Then someone suggested another change, and I built another to try it out.  Eventually I built over a dozen test models, each with minor differences from the last.  There are so many that I'll discuss the details of the puzzle in another post.

In this post I'll concentrate on the surprising economy of this particular model...

Originally this puzzle was designed as a flat slab with a 16mm round disc attached.  Above, the diagram shows it with a rectangular outline around it showing the volume of material the SD300 would build to create this model.  Much of the area above and below the slab is just empty space, but the SD300 would consume that much material in order to support the slab while it built the disc.  This would consume less than $30 worth of material, much cheaper than sending it to a 3D printing service...even deep-discount Shapeways.

But material costs (and build time) were reduced by two-thirds if I built the disc as a separate piece to be glued onto the model after building it.  As shown above, no volume would be wasted above or below the slab.

I could realize a further savings by building two models at a time.  That gave me two complete puzzles in each build job, complete with all their accessories, for less than $10 per puzzle.  Each job consumed only 6% of an SD300 material kit; I could build 32 of these puzzles with 1 box of SD300 material.

Particularly critical was the use of a precision probe, like this Moody Tools set, to peel material out of the narrow grooves.  These probes are also excellent for clearing small holes without marring the model, especially in narrow or deep locations where the standard Solido-supplied tweezers aren't optimal.

Wednesday, January 25, 2012

Peppermint Candy puzzle refined

I took another stab at the Peppermint Candy puzzle which had been vulnerable to coming apart in unintended ways.  I carefully refined the curves so each piece would 'reach around' to brace itself against the back side of the puzzle and made the walls thicker so it would be more rigid.

Honestly, I wasn't sure it would suffice.  But it worked!

Here's the side with the ball sticking out.  The cut in the ball is lined up with the cuts in the shell but it won't open in this position.

The other side of the puzzle looks about the same, but it has a white dome instead of an opening so the ball can't be seen from this side.  The parting line forms an S-shape where it passes through the domed part.

Here's a video explanation of the puzzle in detail.


For comparison I ordered a test part built in SLS nylon.  It's stiffer than the part built on the SD300, a good thing, but it lacks the contrasting colors.  But the colors aren't just cosmetic; my testers thought the colors contributed to the challenge of solving the puzzle.

I built the ball pieces in a very specific orientation in order to put the colors exactly where I wanted them.  Here's how the ball looks outside the puzzle shell.

Since the part required a specific build orientation I couldn't really position it for optimal post-processing.  Each piece had a thin edge that would have been particularly vulnerable to chipping during cleaning, so I isolated that area in a little 'box' of peeling cuts.

Most of the layers in the isolated box fell away when the surrounding areas were cleaned, so it didn't make the cleaning work any slower.  Except when I got to the thinnest part, the isolated box allowed me to gently peel away the last bits of material...leaving the thin edge smooth and intact.  As usual, I solvent-dipped the parts to give them greater strength and a slick finish!

Monday, January 9, 2012

Antichron

A year ago I probably wouldn't have attempted to build something as twisty and complex as Bathsheba's Antichron model.  But someone sent me a reduced-size model of it, and I confidently devised a small set of peeling cuts that should have made it an easy build on the SD300.  Not so easy, as it turned out.

I got it mostly right.  I'd divided the model into four zones in each of the upper and lower sections, so the support material peeled away effortlessly at first.

But when I got near the middle section I found layers of support material permanently wrapped around sculptural features I'd misinterpreted.  If it had been properly planned, there should have been additional cuts to divide the support material but I hadn't instructed the SDMove software to make the proper cuts.

Was it necessary to discard the model just because I hadn't set up the build software properly?  Probably not, but I decided to free the model so from the rest of the material to get a better view of the trouble spots.

The support material was thicker than the walls of the model so I couldn't just remove them by brute force.  So I decided to separate the support layers and snip them one-at-a-time with a small knife.  This was tedious but it would free the model after cutting through dozens of layers on each side.  That would take a while so I put on an old Edward G. Robinson movie (Scarlet Street) while I worked...and it took most of the movie to free the two models I'd built.

Because I'd scaled down the model by 50% the walls were dangerously thin, about 1.4mm.  Somehow I managed to free the first model without any damage, but cracks appeared in the second model while I was cleaning it so I stopped several times and applied Weld-On to strengthen its weak spots.  When I finished cleaning the second model (below right) I dipped it in Weld-On 2004 to heal the cracks and give it a nice sheen.

Sunday, September 4, 2011

More Assorted Stuff

I like puzzles, so I built this Mysterious Wood Joint in transparent material. According to its creator, the joint was adapted from a wood joint used in Osaka Castle. At first glance it looks impossible, but the pieces go together easily when oriented correctly. I wonder if the design could be further modified to make it more like a puzzle.


An SD300 user sent me a picture of a chain they'd had trouble building, which inspired me to attempt one for myself. Problems had occurred when the chain was positioned with alternate links vertical & horizontal like the yellow chain at left. When I built the chain, I positioned it so all the links were positioned at 45° angles relative to the build platform.


I built the model with a single peeling cut running down the center of the chain, which allowed the first half of the support material to peel away easily. But I had to fish out scraps of leftover material behind the links.


After peeling away the other half of the support material I had to fish out the last scraps with tweezers again. But that's okay because it took only a few seconds for each link.


The finished chain had a uniform texture.


I built a 50% scale version of Free Falling Maple Seed becauseI needed an arbitrary model at least 2 mm high to get some layer-thickness measurements from the SD300. The layer lines form attractive, delicate patterns.


These 45-RPM record adapters required minimal material because they're only 2 mm thick.


To add color to the adapters, I stopped the SD300 halfway through the construction of the model and scribbled between layers with permanent markers. This is the middle layer in the model; the color showed through after the rest of thelayers were bonded above this.

Wednesday, August 31, 2011

A Peek into Peeling Cuts

I've received several questions about peeling cuts and removal of the extra material, so here's a brief peek at peeling cuts with my recent screw & nut projects.

The SD300 builds by ironing layers of PVC film on top of the build platform one-at-a-time, and selectively bonding and cutting each layer of PVC film. Regions that belong to the model are bonded to the layers above and below, and unused material is left in-place (as to act as support material) until the build is finished.

Before building these four bolt models (yellow) I added one long peeling cut (blue) to divide the unused material into two halves. The layers of PVC will be stacked parallel to the table, so the peeling cut is perpendicular to the actual layers of the model.


There's no single "right" way to arrange peeling cuts. You could add as many peeling cuts as you want so long as there are enough cuts to free the model from the surrounding material. Here I arbitrarily added an extra peeling cut to isolate some of the support material into two sub-regions.


Thanks to the extra cut, the material peeled away from two of the screws at a time instead of all four. It took longer than it might have, but there's no harm in making extra peeling cuts. Peeling cuts only affect the unused material, they don't cut into the model itself.


The nuts were a little more complicated. I don't put small cuts inside hollow models like I used to because I've learned a better way to remove the material inside holes. (I'll explain that below.) I added peeling cuts between adjacent nuts, but not inside.


Solido provided strong forceps to help peel away material. Those forceps are great for most models, but they're awkward for cleaning material from holes like these so I bought a set of hobby probes.


The probe's sharp point stabs neatly through several layers of unused material in the hole. Tipping the probe lifts the material so it can be pulled away.


Once the ends are free, the material can be pried out by hand.


The layers of extra material have been glued together in a chain. But these layers didn't just pull out freely; I carefully tugged at the edge of each sheet to tear out the next one, one-at-a-time.


Sometimes one layer of support material tears free of the next, so it's necessary to insert the probe and pry the next layer loose before continuing the chain.


After clearing the holes, I removed the rest of the support material from the outside.


Most observers notice there's a high proportion of unused material in each build, which is true. It's roughly like a CNC mill that custom-builds a block for each model, building up the layers additively and then peeling them away material afterward. But it's generally economical because the process is energy-efficient and uses raw material that costs 10 to 15 times less per unit-volume than other 3D printers in its price class. Nevertheless, the cost per model can vary widely from one sample to the next depending on how efficiently the material is utilized.


The SD300 can't directly re-use the leftover material, but it's recyclable as PVC scrap (recycle code 4) by bagging and tagging it and delivering it to a commercial recycler. It can't go with household recycling, so I collect the SD300's scraps in a separate bin. It could also be discarded as ordinary trash since it doesn't contain anything harmful.

Wednesday, June 8, 2011

Efficient peeling cuts revisited

Here's another example of how to arrange peeling cuts for efficient cleaning of an SD300 model. The user adds peeling cuts (the purple walls) while preparing to build models in the SDView software. Peeling cuts don't affect the model, but they instruct the SD300 to cut the support material that surrounds the model so it can be torn away conveniently.

When I had just learned to use the SD300 I tended to put peeling cuts between each individual model to isolate them, resulting in lots of small areas that had to be cleaned one-by-one. But I eventually learned to arrange models so the peeling cuts could be joined and streamlined, peeling several models at once.


These nine models have two continuous peeling cuts that follow the geometry, so the two exterior regions can be peeled away in an easy continuous motion.


After the two outer strips have been removed the models are still connected by leftover support material between them. Much of this can be peeled away in the same manner, as the top and bottom areas are continuous just like the other strips were.


There's still some support material embedded in the middle layers between models, but it doesn't have to be removed layer-by-layer like the other strips. Instead I just loosened up the support material by squeezing a probe between layers in several places...


...then I gripped two adjacent models and gently twisted them to-and-fro, which gradually loosened the support material between the two adjacent pieces. In about 10 to 15 seconds the leftover material was loose enough to free the two adjacent pieces, and I moved on to the next pair of embedded models.


All told, it took less than ten minutes to completely clean these models. The same batch of models probably would've taken a half hour or more if I had isolated them with individual peeling cuts. Back when I was just learning to peel and clean models it probably would've taken over an hour, so experience helps too!