The Solido SD300 Pro is a unique 3D printer that builds solid parts out of layers of PVC plastic film. I created this blog because I don't think there's enough information about it on the Internet. I intend to explore, review, and exploit its unique & quirky features here.
My Its' Nuts toy went on sale at Grand Illusions
last month. Their initial inventory quickly sold out after it appeared
in their monthly newsletter, so I made another batch on the SD300 to
enable them to restock.
Grand Illusions is a web store packed with all sorts of deceptive novelties, plus an online toy museum and gallery.
Here's a video about Its' Nuts featuring Tim Rowett, an extraordinary toy collector who had purchased a copy of the toy directly from me last year at the International Puzzle Party 32 in Washington, DC.
Puzzle designer Evgeniy Grigoriev created his own version, which he titled the Incredible Screw. Grigoriev is famous for his twisty-cube puzzles, and twice set the record for building the World's Smallest Rubik's Cube. On his version, notice how the nuts move at different rates when he turns the bolt!
Matt Ruggles independently designed his own version, which can be downloaded from Thingiverse for anyone who wants to build it. Here's a picture comparing my original model (left) with his design (right).
In May I blogged how I built an enhanced copy of Oskar van Deventer's Cooksey Tribute D puzzle. Oskar already owned a copy of Cooksey Tribute D, and so did I, so Oskar suggested I send the third as a gift to Jerry Slocum, a renowned puzzle enthusiast and author.
Coincidentally two other puzzle enthusiasts, John Rausch and Tyler Barrett, had recently persuaded me to build a small quantity of bolts with trick nuts like the ones in my Wrong Way Nut video so I chose to send one to Jerry. That way Cooksey Tribute D would be a gift from Oskar, and Wrong Way Nut could be a gift from me.
For reference, here's the Wrong Way Nut video:
Jerry telephoned me immediately after he'd received the puzzles and asked if I could possibly build 120 copies of the bolt and nuts for the Puzzle Party. I was thrilled!
We agreed the puzzle needed a name because I had originally adopted "wrong way nut" as a descriptive phrase, not an actual title. Jerry researched to ensure we wouldn't infringe any trademarks. I liked his suggestion Its' Nuts because it used an apostrophe in a nonstandard way, which was a subtle puzzle in itself. Had it been intended as the contraction It's Nuts or a possessive term Its Nuts?
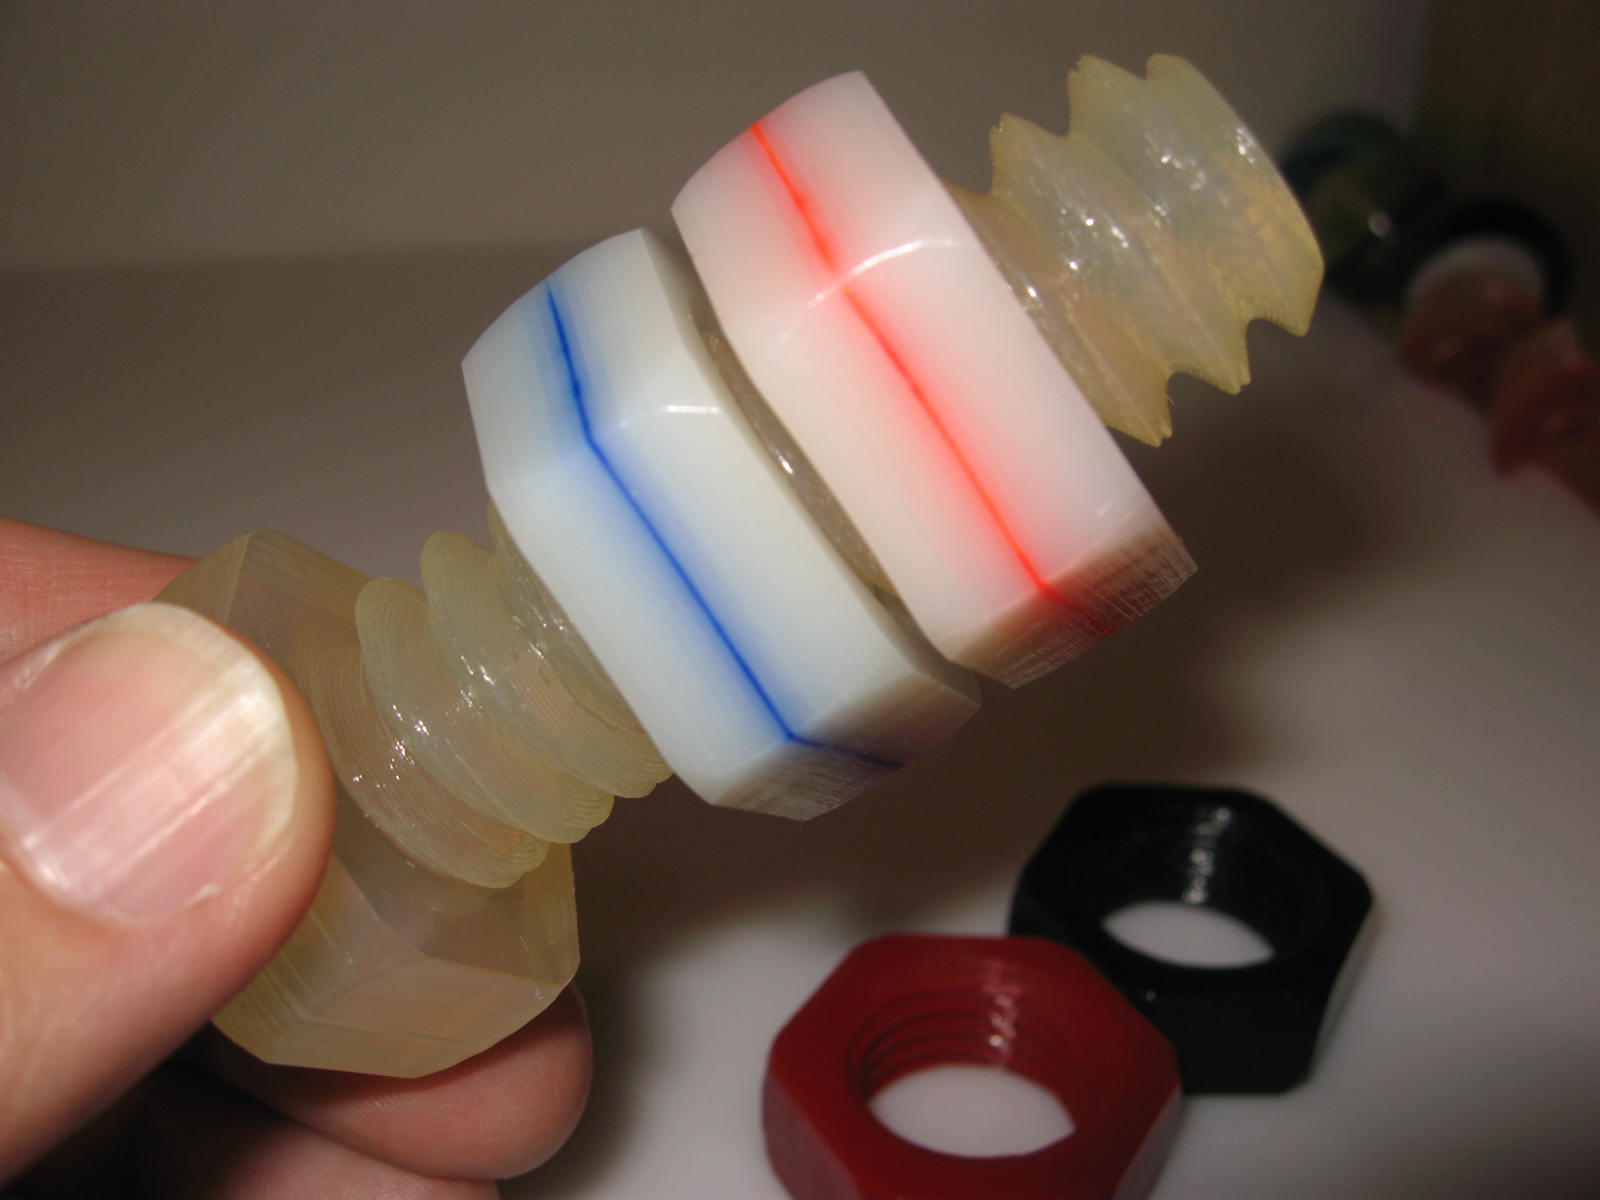
Each nut is embossed with "Its'" on one side and "Nuts" inverted on its opposite side so the puzzle's title appears when the nuts are correctly threaded onto the bolt. Can you work out the probability of correctly assembling the bolt and its nuts so they say Its' Nuts? (It's not just 1 in 2, as you might guess.)
It's customary for entries in the Edward Hordern IPP Puzzle Exchange to carry the name of the person exchanging them and the date of the IPP event when they were exchanged. The bolts I built for Jerry are custom-embossed with IPP32 and the year 2012 on one face, and From Jerry Slocum on an opposite face.
With Jerry's approval, I added my own name to the top of the bolt head to identify myself as the creator. Pay attention to how thin those letters really are, forming narrow strokes less than 1mm thick.
I deliberately made those hollow areas are narrower than 1mm so they wouldn't be sufficiently wide for the SD300 to apply anti-glue inside those narrow channels. Consequently the letters are glued into the solid bolt head when the SD300 builds them, forming subtle outlines that can only be read by carefully examining the sheen of the top surface.
Screw threads need a slick finish, but the SD300 ordinarily builds layers with sharply-defined edges so I dipped every single nut and bolt in Weld-On 2007.
The solvent smooths and seals the layers, but after a few uses the solvent also tends to fog up the glossy top surface--an undesirable side effect. To avoid fogging I learned how to dip the bolt only up to the sides of the hex-shaped head, but that left the side walls of the bolt head with a half-glossy/half-matte appearance. The solution? I wiped the side walls with ordinary PVC Pipe Primer from my local plumbing supply--it contains just enough solvents to impart a uniformly glossy appearance, and it includes a neat applicator.
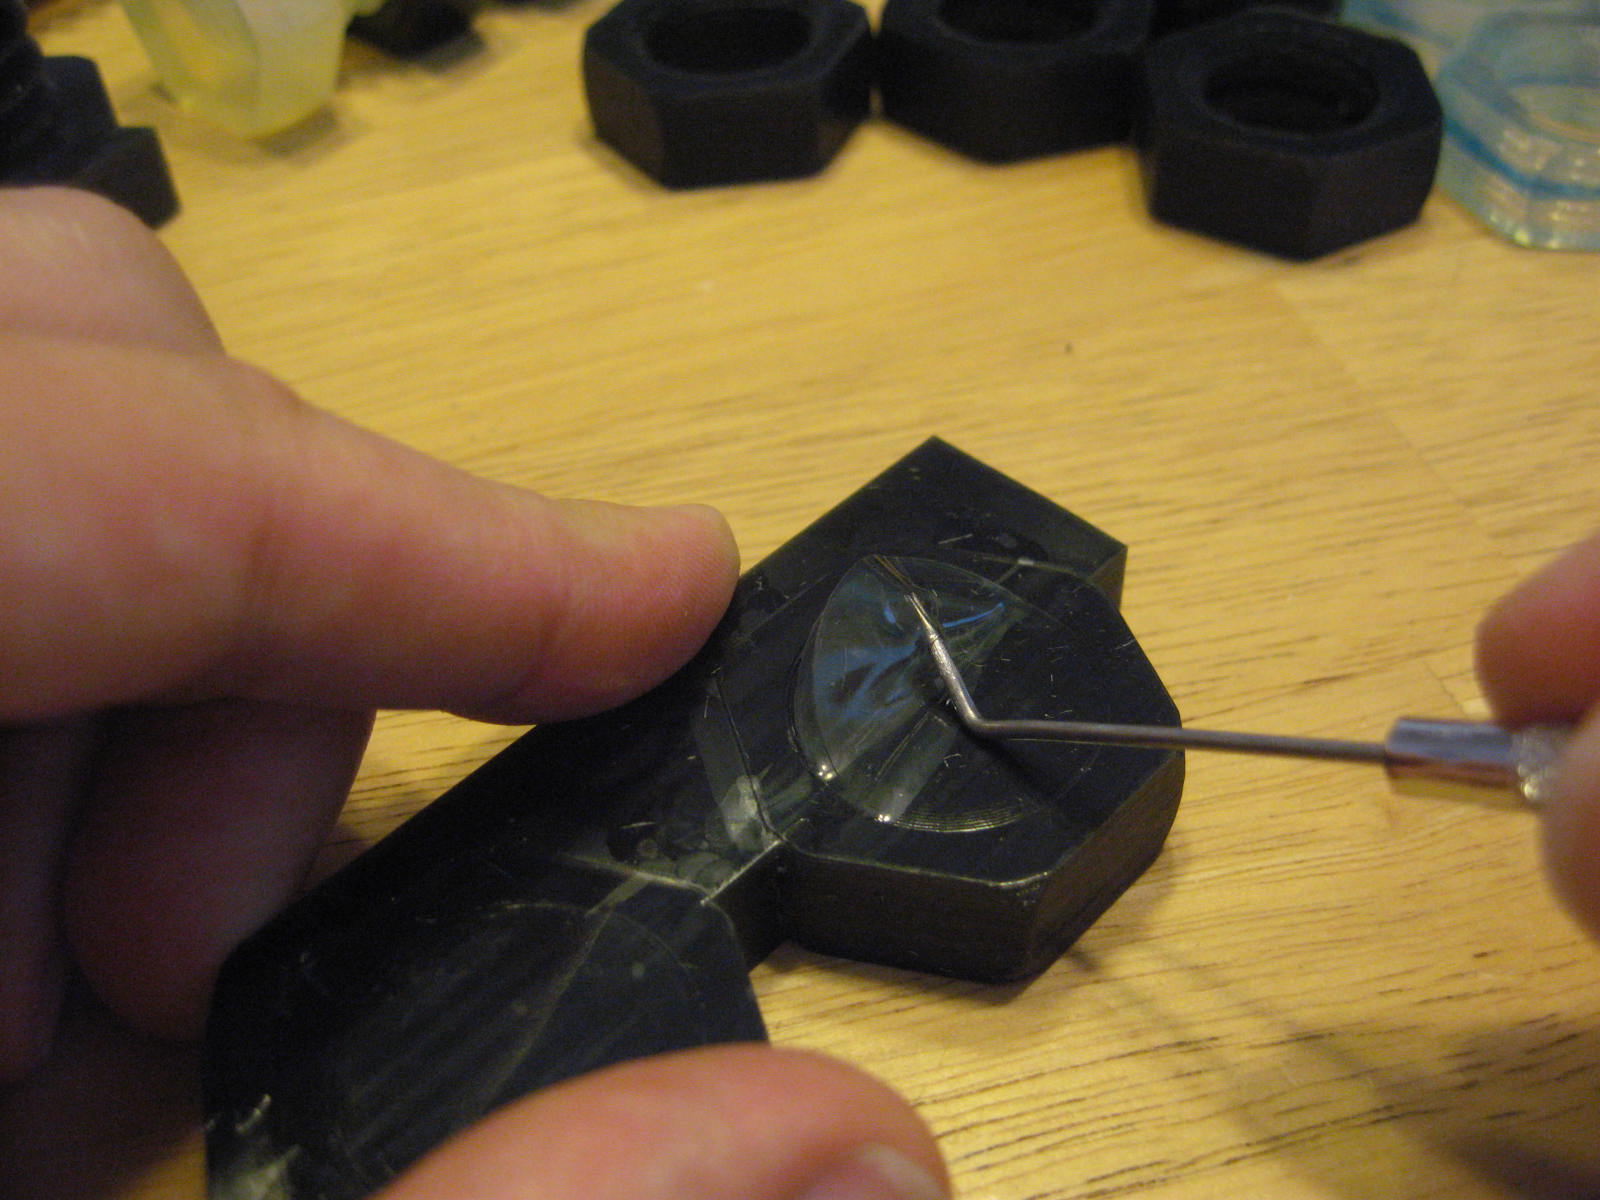
This was a big project. It took over a week to build all those bolts, and almost two weeks more to build all the nuts. The nuts were more trouble than the bolts because I had to manually clear 72 layers of leftover support material from the center of each nut, tearing out the layers with a pointed probe as illustrated in this previous blog post. It went at least twice as fast if I heated the model in my microwave oven for 30 seconds, a tip I learned from Jason Harris.
After the various pieces had been built, I assembled them into completed Its' Nuts sets.
I vacuum packed the bolt sets in groups for convenient shipping to Jerry.
For their final presentation Jerry repackaged Its' Nuts into individual prescription-drug containers, playfully labeled Slocum Pharmacy. It included a caution, "Be sure to take with 1 grain of salt."
Jerry Slocum increased his order to 135 sets of Its' Nuts and I managed to build all 135 of them without any rejects or second-quality parts. I sent him every single bolt I had built with the custom "From Jerry Slocum" inscription, and I forgot to keep one for myself! I'm happy to build more bolts, but I wouldn't allow myself to build any more of Jerry's bolts--I regard them as a work-for-hire.
So I negotiated a puzzle-swap: he traded me one of the customized IPP bolts and in exchange I gave him this one-of-a-kind bolt that was professionally built via SLA, polished, and lacquered by a professional bureau. To commemorate the occasion, I paired it with the very first nuts that had ever been inscribed with Its' Nuts.
Epilogue... Jerry Slocum won me over to the name Its' Nuts because the odd placement of the apostrophe struck me as a clever piece of word-play. He later confessed that it originated as a typo.
Last month I shared my Wrong Way Bolt model, but home users found themselves unable to build functional copies of it using hobby-type 3D printers like the Makerbot Thing-o-Matic. The model's geometry seemed to fall within the rule-of-thumb limits, but I looked closely at individual 'slices' of the model and thought about what would actually occur when it was built using a hobby extruder.
Here's what might have happened.
At left is a slice of the trick nut, color-coded with shades of red to indicate the region to be built for the present layer. Bright red areas are supported by the layer below while dark-red areas are unsupported overhangs. When an hobby-type 3D printer tries to build the overhang marked with a circle its extruder would follow the path in white but the thread of extruded plastic won't have any support. As a result, the thread will be pulled into a straight line between the two points where it's supported by the layer underneath. The Makerbot would probably build some of the overhang, like the diagram at right. It would probably need multiple layers before it could build that whole overhang, but each layer moves the overhang to a different place (because it's a screw) so the hobby-printer wouldn't have a chance to catch up.
The model could probably be adapted for hobby-type printers by designing the threads with a goal of eliminating the concave shapes. Overhangs could probably be built with very high accuracy so long as they didn't have curves or corners in the unsupported regions. So I designed a trick thread with a cross-section whose overhangs form straight lines, like so...
I don't own a Makerbot (nor any other hobby printer) so I don't really know if this will be any more buildable than the model I'd originally designed for my SD300. But it's a starting point, in any event, as the trick threads function correctly and I'm sharing the source data so other users can adapt it if needed.
This new model and its source data are available from Thingiverse here so anyone can download it and edit it.
A Thingiverse user saw my Wrong Way Nut video on YouTube, which showed two nuts traveling in opposite directions on the same screw thread. He was inspired to create his own version of it, which he named Screwy Screw. Full marks for that name!
It was interesting to see how he came up with a similar solution, yet made some vastly different aesthetic choices. Most conspicuously, his Screwy Screw is much larger than my own bolt model.
Here's a quick video comparison of Screwy Screw against samples of Wrong Way Nut built on my SD300 and another sample built by Bradley Rigdon courtesy of http://printo3d.com/
Here's a closeup of the FDM samples of Wrong Way Nut, built by Bradley Rigdon. Notice the funny patterns on the side walls? See below.
Below is a closeup comparison of a nut built on the SD300 (red) and one built on a Dimension by Stratasys (blue). Both build processes produce these wave-like patterns, often referred to as "chatter", as a result of very subtle vibrations that occur as the machine changes direction at the corners. The marks don't affect the model's tolerances--in fact they're hard to see except by examining the model's sheen under a bright light source as here.
STL files for Wrong Way Nut are downloadable from Thingiverse here.
I've received several questions about peeling cuts and removal of the extra material, so here's a brief peek at peeling cuts with my recent screw & nut projects.
The SD300 builds by ironing layers of PVC film on top of the build platform one-at-a-time, and selectively bonding and cutting each layer of PVC film. Regions that belong to the model are bonded to the layers above and below, and unused material is left in-place (as to act as support material) until the build is finished.
Before building these four bolt models (yellow) I added one long peeling cut (blue) to divide the unused material into two halves. The layers of PVC will be stacked parallel to the table, so the peeling cut is perpendicular to the actual layers of the model.
There's no single "right" way to arrange peeling cuts. You could add as many peeling cuts as you want so long as there are enough cuts to free the model from the surrounding material. Here I arbitrarily added an extra peeling cut to isolate some of the support material into two sub-regions.
Thanks to the extra cut, the material peeled away from two of the screws at a time instead of all four. It took longer than it might have, but there's no harm in making extra peeling cuts. Peeling cuts only affect the unused material, they don't cut into the model itself.
The nuts were a little more complicated. I don't put small cuts inside hollow models like I used to because I've learned a better way to remove the material inside holes. (I'll explain that below.) I added peeling cuts between adjacent nuts, but not inside.
Solido provided strong forceps to help peel away material. Those forceps are great for most models, but they're awkward for cleaning material from holes like these so I bought a set of hobby probes.
The probe's sharp point stabs neatly through several layers of unused material in the hole. Tipping the probe lifts the material so it can be pulled away.
Once the ends are free, the material can be pried out by hand.
The layers of extra material have been glued together in a chain. But these layers didn't just pull out freely; I carefully tugged at the edge of each sheet to tear out the next one, one-at-a-time.
Sometimes one layer of support material tears free of the next, so it's necessary to insert the probe and pry the next layer loose before continuing the chain.
After clearing the holes, I removed the rest of the support material from the outside.
Most observers notice there's a high proportion of unused material in each build, which is true. It's roughly like a CNC mill that custom-builds a block for each model, building up the layers additively and then peeling them away material afterward. But it's generally economical because the process is energy-efficient and uses raw material that costs 10 to 15 times less per unit-volume than other 3D printers in its price class. Nevertheless, the cost per model can vary widely from one sample to the next depending on how efficiently the material is utilized.
The SD300 can't directly re-use the leftover material, but it's recyclable as PVC scrap (recycle code 4) by bagging and tagging it and delivering it to a commercial recycler. It can't go with household recycling, so I collect the SD300's scraps in a separate bin. It could also be discarded as ordinary trash since it doesn't contain anything harmful.
A moderator on my favorite puzzle-building forum called attention to a YouTube video entitled Magic Nuts and Screw Threads in which two nuts are shown unscrewing in opposite directions on the same threaded rod.
I don't have any inside information about the trick nut in the video, but I conjectured I could build a nut that would behave like that. The threas on my first test model turn a bit tightly, but it works!
I will record a better demo video later. It could use a little refinement, and the screw threads need to be a lot longer for a better demonstration. But it's sure gratifying when a new idea passes the proof-of-concept test on the first try!
I've been interested in puzzles ever since I stole my sister's Rubik's Cube back in the 1980s. I've grown to love mechanical puzzles of all types, not just the twisty "cube" puzzles. First I expressed my creativity by trying to make pretty patterns, but now I want to build my own puzzles too!