Showing posts with label moire. Show all posts

Monday, July 29, 2013

Rundown of puzzles for IPP33

Peppermint, my entry for the puzzle exchange, was digitally manufactured in colorful ABS by Bradley Rigdon at PrintTo3D.  I built prototypes on my SD300, those PVC models were a bit too flexible to give the right "feel" for this particular puzzle.  Each piece is made in two colors, red and white; the colors play a subtle but important role.

 Moiré Maze combines laser-cut acrylic and 3D printed vinyl.  The challenge is to guide a small magnet through the maze from Start to Finish.  That goal sounds simple enough, but it's easy to get lost in the visually-confounding patterns of rings reflected against a mirrored background.

Cubic Trisection is one of the puzzles I also sold at IPP32 last year.  The challenge is to assemble the three pieces into a cube, as shown.  All three pieces are identical, but not symmetrical.  Most users easily assemble the first two pieces, but encounter trouble adding the third.

Puckup is a two-piece assembly puzzle, which I'm selling in transparent material or a red-white color scheme.  Tyler Barrett suggested a somewhat edgier name "What the Puck" but the simpler Puckup name had already been picked up on one of the puzzle forums.

Twisty Trillion is a successor to Puckup whose shape provokes a lot more confusion among users.  Neither puzzle is fiendishly difficult, but Twisty Trillion takes most people a whole lot longer to figure out.  I built them all on the SD300 using transparent vinyl because light reflects attractively inside the puzzle.

I commissioned two copies of a Trillion Pendant to be built as puzzle jewelry--one in brass from i.Materialise, the other in silver from Shapeways.  But neither model was delivered on time--Shapeways lost one of the pieces, and i.Materialise is over 3 weeks behind schedule.  So I salvaged the partly-incomplete silver model by building its other half in luxuriously-dark blue vinyl, which contrasts gracefully with the silver piece.  Frankly, it looks nicer than it would have if both pieces had been silver!

Here's a colorful assortment of marble puzzles, three of which will be available for sale as Bag of Marbles.  The others are experimental designs, which I'd like to test on a few puzzlers at IPP.  In particular, the pink and purple models are two closely-related designs, but my first few testers think the purple one is much harder than the pink one.  Will others react the same way?  IPP is a great opportunity to find out!

Monday, July 22, 2013

More on Moiré

I previously wrote about my Moiré Maze puzzle as if it was finished, but it had all sorts of unfinished details until this weekend.  For example I didn't have suitable packaging until George Bell referred me to Clear Bags which supplied the attractive box pictured above.

I built this inexpensive plastic insert on the SD300 to hold the puzzle safely inside the box.


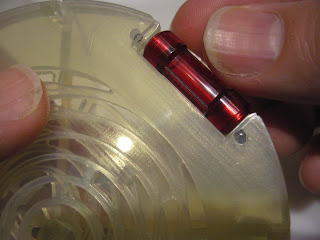
The closeup above emphasizes two more gripes:
  • The Start and Finish are denoted by two bulb-shaped chambers, but there aren't any markings to identify which is which.  I suppose I could supply an instruction sheet, but it could get lost.
  • It really needed some sort of mechanism or barrier to keep the chambers separate, to prevent the user from trivially moving the magnet from Start to Finish without tracing the maze.  The acrylic cutting pattern included an eyelet for attaching such a mechanism, but how should I use it?
 
To add markings to the puzzle, I used a KNK Zing plotter-engraver I had recently purchased.  The machine can't handle the bare acrylic pieces so I 3D-printed a template and taped it to a large piece of poster paper, which the machine happily accepted.

To calibrate the KNK Zing to the acrylic sheet, I aligned the the engraver's laser-pointer with a small hole in the 3D-printed template/holder.  And I installed a diamond-tipped engraving tool into the plotter.

Start and Finish are clearly identified after engraving.

And I installed a one-way vinyl flap that permits the magnet to be pulled from the Finish chamber to the Start chamber.  It doesn't let the magnet slide the other way.  The only way to travel from the Start to the Finish is to navigate the maze.

Saturday, March 9, 2013

Puzzle Overview: Moiré Maze

I've previously posted about the development of Moiré Maze so here's an overview of how it works as a puzzle.  There are a few clues about its solution but no spoilers.

At left is Oskar's Boston Subway puzzle from 2006.  It's a sandwich of acrylic sheets containing laser-cut channels; the bottom layer has 10 parallel channels running north-south and the top layer contains 10 parallel channels running east-west.  It's a criss-cross grid.  There's a layer in between that selectively connects the top and bottom grids at some places, thereby turning it into a puzzling maze.  George Miller constructed the puzzles and put inside a small magnet the user can guide through the maze using a magnetized wand.

It occurred to me to build a similar layered maze using circles instead of straight lines.  Ultimately I developed two layers of concentric ring-shaped channels, one over the other as depicted at left.  The layer at right is sandwiched between the other two layers to selectively allow the user to transfer between the two sets of rings like a maze.

The layers are stacked like this with a mirror on the bottom and a transparent cover on top.  I carefully selected a combination of layer thicknesses and a much thinner magnet to prevent the magnet from becoming turning sideways and becoming wedged between layers, a nuisance Boston Subway sometimes exhibited.

Laser cut acrylic comes with a protective film over the surface.  To avoid getting dust and fingerprints on the layers inside the puzzle, I only removed the protective film after each layer had been assembled into the puzzle.

But there's more to this puzzle than a mere shape variation on Boston Subway--it introduces a visual subterfuge that misdirects the user away from the solution.  The critical secret is plainly visible, even in the photo, but it's tough for a viewer to choose to see it once their mind has resolved the image.  Some testers couldn't even force themselves to see it when the solution was shown to them.

In Boston Subway it was sometimes difficult to locate the little silvery magnet because it reflected the same colors as the neutral mirror and irridescent sheets.  I chose to use a bronze-colored mirror with Moiré Maze to enhance the contrast, so the silver magnet is easier to distinguish against the bronze-tinted background.

As a final touch I gave Moiré Maze a built-in stand that secures the layers and holds the puzzle at a convenient slope for playing.  Initially I'd planned to make the stand with laser-cut acrylic like the rest of the puzzle, but after some experimentation I substituted dark-blue pieces 3D-printed from my SD300 because the PVC material is so resilient that it can squeeze the acrylic sheets tightly together.  If I had made those piece of acrylic, then the stand's outer pieces would be strained in tension and would thus be vulnerable to breakage--acrylic tends to fracture under stress.

Wednesday, February 6, 2013

Moiré Maze for laser cutter

I took last month's injection-molded prototype for Moiré Maze and adapted it back for laser cutting by projecting it into 2-dimensional layers and tracing their outlines.  I don't own a laser cutter, but plenty of businesses offer laser cutting services including mail-order Ponoko.  But why wait for the mail?

The SD300 can make good simulations of laser-cut parts, given adequate model data.  I created accurate simulations of laser-cut models by first modeling a sheet about the anticipated thickness of the part, about 3.0 mm to simulate the typical "eighth inch acrylic" (which usually runs a tad thin).  To simulate a laser's cutting behavior I cut the outlines using a "thin wall cut" with a 2 degree draft angle.

Models were easy to clean because the sheet-like design meant there weren't any overhangs, undercuts, or loose ends to deal with.  It was easy to stab leftover support material and peel it away from both sides of each finished piece.

I also designed a 2-piece base, shown upside-down here, on which the maze layers are stacked.  The base aligns the maze pieces and holds them together.

The magnetic wand can be stored in a compartment at the top edge of the maze, and it's held in place because the magnets in the wand are attracted to steel beads embedded inside the model.

Above is a brief video tour of Moiré Maze.

Moiré Maze was inspired by Boston Subway, Oskar van Deventer's design for IPP26 shown at left in the picture.  Boston Subway has layers of criss-crossing channels built from laser-cut acrylic, and the goal was to guide a little magnet from "work" to "home" using a magnetic wand.  Moiré Maze substitutes ring-shaped channels for the straight ones, and thereby creates a visual hiding place for its solution even though it's entirely transparent!

Monday, January 14, 2013

Evaluating Protomold and Moiré Maze

A friend from IPP suggested I investigate a company called Protomold for their expertise in rapid injection molding and wide selection of materials.  Although he was not a puzzle builder himself, he had apparently sponsored production of another designer's puzzle via Protomold and was pleased with their work.

As an exercise I chose to adapt Moiré Maze, a design I briefly tested in 2009.  The original test model contained 5 layers of transparent laser-cut acrylic containing ring-shaped channels.  The goal is use a magnetic wand to guide a small magnet through the channels from start to finish.  The lowest layer is a mirror, which I hoped would create an illusion that would disguise one secret feature so its solution could literally hide in plain sight.

I gave the prototype (pictured above) to several testers, and their toils demonstrated the secret feature was a success.  But the maze as a whole was much too elaborate, the nine pairs of overlapping rings merged into a dizzying kaleidoscope of curves.  The key feature worked, but testers agreed the overall maze was just too complicated.

So I consolidated the inner layers of Moiré Maze into a single 3D model, simplified the maze to just six rings, and added details for a built-in stand that could be injection-molded in a standard 2-part mold.  I requested a quote from Protomold, and in the meantime I built a test prototype on the SD300.

As it turns out, the SD300 is great at building a model that's designed for injection molding because there aren't any overhangs to get in the way while cleaning unused material off the model.  I did need to use a fine probe to clear the smaller channels, but it was easy because I had unobstructed access from both sides.

Both sides of the model needed some sort of lip to hold the cover pieces, so I designed these little tabs.  This tab is an example of a sliding shutoff.  It looks like an overhang but it really isn't--the other half of the mold would project through the hole in order to form the underside of the tab.

It's always good to build a prototype: during inspection I discovered an error in my maze.

Upon correcting the error I built another test model, this time using the SD300's transparent material because the user is supposed to see through the mazes.  My PVC material isn't nearly as transparent as acrylic, and there are blemishes from the SD300's construction process.  But it's an excellent test model!

Also using the SD300, I built a pair of transparent covers.  Above, I installed the back panel into the test model.  The back panel ought to be cut from acrylic mirror material, but a simple transparent panel would suffice for testing.

I dropped a small magnet inside and then installed the top cover.

The challenge is to navigate the maze from start to finish by using a magnetic wand to guide the little magnet through the channels between the two covers.

Protomold replied within 1 business day, giving me an interactive quote that enabled me to gauge the cost of various options.  These folks obviously know their business!  Their versatile quoting system permits the customer to view and evaluate their quote in four distinct ways, at the user's discretion:
  • As a straightforward web page (pictured above) with tabs and interactive elements.
  • As an enhanced web page with a powerful 3D plug-in.
  • As a printable PDF document with all the information comprehensively laid out.
  • As an enhanced PDF document that exploits Adobe Reader's ability to view 3D models.
The report called attention to six "required changes" that would need to be addressed for the model to be injection molded.  Five of these were the result of a single error in my model, which caused an undesirable indentation in the walls.  Pictured above, Protoquote's interactive plug-in highlighted the error and explained exactly what action was required and why.

Additionally, the report explained the ramifications of certain attributes that might have cosmetic or functional ramifications on the finished part even though they wouldn't prevent the model from being built as-is.  For instance, the blue marking show where "sink marks" could appear in the finished model because injection molded plastic shrinks as it cools.

After I resolved the "required changes" Protomold supplied an updated report.  Now that the model was completely build-able the report added an informational section calling out foreseeable (but harmless) side effects of the tool-making process.  Pictured above is a sample of the "Printable PDF" version of the report, denoting where sharp corners would come out very slightly rounded as a machining artifact.

It was a valuable experience, and this particular model was probably an ideal choice for learning how to make an injection-molded design.  But, in my final analysis I concluded injection-molding isn't suitable for this particular project in the quantities I needed because:
  • This particular design still required laser-cut parts for the mirror and top cover.  Injection molding merely reduced the volume of laser-cut parts per model (from 5 down to 2), it didn't eliminate laser cutting entirely.
  • To attain the required transparency the molds would require laborious polishing to a mirror finish.  That polishing would cost more than all other expenses combined, which rendered the project hopelessly uneconomical for a small production run.
  • Critical geometry includes a knife-edge "gore" where two arcs converge toward an intersection, a feature not suited for injection molding.  Hence injection molding would diminish the quality of that particular detail.
  • The previous test model had already demonstrated the design was suitable for being laser cut.
Still, it would be nice to devise a design that would be optimal (and economical) for injection molding--preferably something I couldn't otherwise fabricate.  Protomold offers a wide selection of engineering materials, including elastomers.  Hmm.  I have an idea that could use Santoprene...