Showing posts with label transparency. Show all posts

Wednesday, June 12, 2013

What should I name this puzzle?

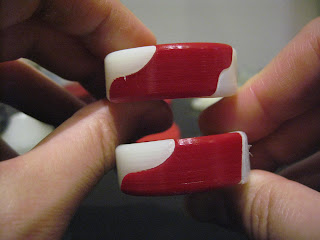
It pays to share with non-puzzlers.  This puzzle was inspired by a non-puzzler's comments on a study model, and it reached completion in just a few days.  And it's remarkably ideal for building on my SD300 because it can mass-produce them quickly, easily, and economically.

 It began when I shared this geometric model with my coworkers--several people enjoyed playing with it.  It's not really a puzzle, but when they took it apart they had trouble putting it back together.  One coworker attributed it to the circular shape, the most distinguishable feature when the pieces are apart, because it encourages the user to instinctively follow the wrong contours.

His comments let me to design this puzzle with two congruent pieces, whose circular shape and curved surfaces are intended to mislead the user.  This is a breakthrough puzzle for me because it's my first that uses congruent pieces that exhibit symmetry relative to each other, yet it has only one unique solution out of the four permutations in which the pieces could be oriented.

 The side walls give a small hint at how it works.  Not much, though.

I'd originally planned it as a colorful opaque puzzle, with an appearance like a bonbon.  But it looks stunning in the SD300's transparent material, which shows off the delicate internal contours when the puzzle is assembled.

I'm also experimenting with other applications of these principles.  This trillion-shaped puzzle has contours that imply 3 axes of rotation, running through each of the 3 corners.  Naturally that's not really possible, but the illusion is sufficiently distracting that my testers had a really hard time with it.

Wednesday, May 29, 2013

Not-so-wonderful Waterful

Inspired by a wasp trap, a friend suggested a water-filled dexterity puzzle that challenges the user to guide a floating ball into an inverted funnel.  It's a cool idea, but why not use two balls: one that floats and another that sinks.  I designed a two-piece box that had transparent windows and two funnel-shaped goals.


I put two little balls inside and sealed it full of water.  One ball is polypropylene, which floats, while the other is made of PTFE, which sinks.  The challenge is to get the floating ball into the funnel at the top and the sinking ball into the funnel at the bottom--at the same time!  My first test model seemed to work perfectly.


Problem!  The PVC windows gradually fogged up as the PVC absorbed moisure.  After a couple of days it turned completely opaque.  This effect is reversible: it turns transparent again if it dries out, but the puzzle needs to be filled with water so this design just wasn't practical.


So I tried a different approach: I incorporated the funnels into two caps that could be bonded to a piece of acrylic tubing.  Acrylic doesn't absorb moisture so it would stay crystal clear, right?  I assembled a test model and filled it through a fine needle and sealed it up.


This worked much better: the side walls were perfectly clear and the cylindrical shape worked like a lens.  Here's how it looks when solved, with the floating ball in the funnel at top (barely visible) and the sinking ball in the bottom funnel.  At first it seemed perfect: no fogging, no bubbles!


But a small bubble appeared a few days later, and gradually grew.  After two months it had grown so large that it interfered with the balls, and it's obviously going to keep growing.  So this won't work, either.

Although the containers seem to be watertight--no leaks--I'm guessing the PVC isn't vaportight.  So the water vapor could be escaping by diffusion through the PVC end caps.  But my coworkers liked this puzzle while it worked, so it's worth another try.  Back to the drawing board!

Monday, January 14, 2013

Evaluating Protomold and Moiré Maze

A friend from IPP suggested I investigate a company called Protomold for their expertise in rapid injection molding and wide selection of materials.  Although he was not a puzzle builder himself, he had apparently sponsored production of another designer's puzzle via Protomold and was pleased with their work.

As an exercise I chose to adapt Moiré Maze, a design I briefly tested in 2009.  The original test model contained 5 layers of transparent laser-cut acrylic containing ring-shaped channels.  The goal is use a magnetic wand to guide a small magnet through the channels from start to finish.  The lowest layer is a mirror, which I hoped would create an illusion that would disguise one secret feature so its solution could literally hide in plain sight.

I gave the prototype (pictured above) to several testers, and their toils demonstrated the secret feature was a success.  But the maze as a whole was much too elaborate, the nine pairs of overlapping rings merged into a dizzying kaleidoscope of curves.  The key feature worked, but testers agreed the overall maze was just too complicated.

So I consolidated the inner layers of Moiré Maze into a single 3D model, simplified the maze to just six rings, and added details for a built-in stand that could be injection-molded in a standard 2-part mold.  I requested a quote from Protomold, and in the meantime I built a test prototype on the SD300.

As it turns out, the SD300 is great at building a model that's designed for injection molding because there aren't any overhangs to get in the way while cleaning unused material off the model.  I did need to use a fine probe to clear the smaller channels, but it was easy because I had unobstructed access from both sides.

Both sides of the model needed some sort of lip to hold the cover pieces, so I designed these little tabs.  This tab is an example of a sliding shutoff.  It looks like an overhang but it really isn't--the other half of the mold would project through the hole in order to form the underside of the tab.

It's always good to build a prototype: during inspection I discovered an error in my maze.

Upon correcting the error I built another test model, this time using the SD300's transparent material because the user is supposed to see through the mazes.  My PVC material isn't nearly as transparent as acrylic, and there are blemishes from the SD300's construction process.  But it's an excellent test model!

Also using the SD300, I built a pair of transparent covers.  Above, I installed the back panel into the test model.  The back panel ought to be cut from acrylic mirror material, but a simple transparent panel would suffice for testing.

I dropped a small magnet inside and then installed the top cover.

The challenge is to navigate the maze from start to finish by using a magnetic wand to guide the little magnet through the channels between the two covers.

Protomold replied within 1 business day, giving me an interactive quote that enabled me to gauge the cost of various options.  These folks obviously know their business!  Their versatile quoting system permits the customer to view and evaluate their quote in four distinct ways, at the user's discretion:
  • As a straightforward web page (pictured above) with tabs and interactive elements.
  • As an enhanced web page with a powerful 3D plug-in.
  • As a printable PDF document with all the information comprehensively laid out.
  • As an enhanced PDF document that exploits Adobe Reader's ability to view 3D models.
The report called attention to six "required changes" that would need to be addressed for the model to be injection molded.  Five of these were the result of a single error in my model, which caused an undesirable indentation in the walls.  Pictured above, Protoquote's interactive plug-in highlighted the error and explained exactly what action was required and why.

Additionally, the report explained the ramifications of certain attributes that might have cosmetic or functional ramifications on the finished part even though they wouldn't prevent the model from being built as-is.  For instance, the blue marking show where "sink marks" could appear in the finished model because injection molded plastic shrinks as it cools.

After I resolved the "required changes" Protomold supplied an updated report.  Now that the model was completely build-able the report added an informational section calling out foreseeable (but harmless) side effects of the tool-making process.  Pictured above is a sample of the "Printable PDF" version of the report, denoting where sharp corners would come out very slightly rounded as a machining artifact.

It was a valuable experience, and this particular model was probably an ideal choice for learning how to make an injection-molded design.  But, in my final analysis I concluded injection-molding isn't suitable for this particular project in the quantities I needed because:
  • This particular design still required laser-cut parts for the mirror and top cover.  Injection molding merely reduced the volume of laser-cut parts per model (from 5 down to 2), it didn't eliminate laser cutting entirely.
  • To attain the required transparency the molds would require laborious polishing to a mirror finish.  That polishing would cost more than all other expenses combined, which rendered the project hopelessly uneconomical for a small production run.
  • Critical geometry includes a knife-edge "gore" where two arcs converge toward an intersection, a feature not suited for injection molding.  Hence injection molding would diminish the quality of that particular detail.
  • The previous test model had already demonstrated the design was suitable for being laser cut.
Still, it would be nice to devise a design that would be optimal (and economical) for injection molding--preferably something I couldn't otherwise fabricate.  Protomold offers a wide selection of engineering materials, including elastomers.  Hmm.  I have an idea that could use Santoprene...

Tuesday, May 1, 2012

Cooksey Tribute D re-colored

Last year I built a brightly-colored version of Oskar van Deventer's Cooksey Tribute D puzzle by building it with transparent material and filling the interior with bright acrylic paint.  It was pretty but the transparent maze was virtually invisible, which totally defeated the purpose of the transparent collars I had built for the Cooksey Tribute puzzles a year earlier.

Oskar painstakingly painted the surface of the maze with black paint so it could be seen through the collar.  That worked, and it was practical, but I tried a different method...

Using a 49-gauge needle and a squeeze bottle, I applied paint inside the channels while leaving the raised maze unpainted.

The unpainted maze stands out in clear contrast to the brightly-painted background, so the maze can be seen through the transparent collar.

This video illustrates the benefits of the new paint job compared to the previous one.  I put an animated light inside for a little extra effect!

A side effect of this new paint scheme: light shines through the maze when the puzzle is back-lighted.

Sunday, February 12, 2012

A Box for Guile

I've been trying to develop a puzzle that requires a box with very, very specific dimensions.  I couldn't find a ready-made box of the right size so I tried building it with laser-cut acrylic panels, but the box didn't have the right characteristics...and I lost access to the laser so I couldn't continue experimenting with it.

To build the box on the SD300 I designed a flat model with hinges that would reproduce the exact interior I needed when the wall panels were folded.

For stability I added a ridge along one edge that could engage tabs on the side walls.


When the panels are folded into the right shape there's a groove around the top rim of the box.

A separate plastic rim snaps into the groove, thereby completing the box.

The finished box matches the dimensions of my laser-cut prototype, but it adds the lid mechanism that was missing from the laser-cut model.  Now I can build as many as I need.

Friday, February 3, 2012

Nikola Tesla and Blue

Nikola Tesla proposed a Valvular Conduit in which fluid (or gas) flows freely in only one direction.  There are no moving parts, but reverse flow is impeded by inducing turbulence at the backward-facing junctions.

I expected it to be an ideal model to build in transparent material, thereby allowing the user to see inside, but I found my model just a bit too transparent.  Yes, I could see inside the model but it was hard to distinguish the channels from the walls.  Ordinarily I would resolve that by adding a layer of red material, which is strongly colored so it makes a good contrast.

But a friend had recently hooked me up with a carton of dark blue VisiJet LD material, which is 100% compatible with the SD300.  I hadn't tried it out yet, so this seemed like a good opportunity to test it.

I built another model of the conduit using transparent material as before, except this time I put in the blue material for just one layer.  When I removed the unused material the outline of the conduit emerged in sharp contrast.

The blue material makes the conduit walls stand out vividly.

Now it's easy to distinguish the channel even when looking through the fully assembled model.  Fluids can move easily through the conduit from left-to-right because the junctions converge without creating much turbulence, but right-to-left flow is impeded because the junctions divide the flow and force it back across its own path.

Friday, January 27, 2012

Locked Dovetail Triangle

When I posted my Dovetail Triangle one user suggested adding a locking mechanism while another argued against it.  So let's have it both ways: I built a new dovetail mechanism that has a locking mechanism, shared here at Thingiverse, to complement the one that doesn't have a locking mechanism here.

As before, I aimed to keep overhangs within the buildable range of Makerbots and other hobby printers.  That imposed some interesting design constraints, which forced me to distribute features of the locking mechanism between the base and lid.  But I filleted the internal corners to 0.5mm purely for my own convenience: it's a bit easier to peel unused material out of SD300 models if there aren't sharp internal corners.


At first I built a transparent model and tested it with two black triangular pieces so I could look inside to see how well it was working.  It's hard to see, but the picture below shows how the black triangles slide toward the outside of the puzzle when it's lying flat and thus lock the joint.
The black triangular pieces (dark shadows) slide toward the outer corners.

When it's flipped upside down, the contours in the lid cause the black triangles to slide toward the outside edges, locking the joint like the previous picture.
When flipped over the triangular pieces still slide toward the corners.
It worked, but those triangular pieces just didn't slide very well.  So I tried using round discs instead.  That worked much better because the discs easily rolled around when the puzzle was tipped.

Here's a video showing how the parts work and how the puzzle opens.

I designed the mechanism so it would only unlock when one particular corner of the triangle was pointed downward, because I thought that would be the least intuitive way to hold the puzzle.  As it turns out I'd guessed wrongly about that: testers instinctively hold the puzzle with one of the dovetails facing up (to look at the joint, I guess) and hence they naturally hold it with a corner pointing downward.  So it isn't especially challenging, but it definitely works!

Sunday, April 10, 2011

Traffic cones with light pipe


I've been watching for an opportunity use the SD300's ability to embed light-pipe-like transparency in a model, so I decided to adapt a Traffic Cone model I stumbled upon at Thingiverse.

I built the models upside-down, with a few layers of red followed by several millimeters of transparent layers to form a window between the interior cavity and the outside walls.


As usual with hollow models I chose to clean the leftover material out of the cavities before I removed the exterior supports. That makes it simple to hold onto the models because they're still embedded in the model block.


When the exterior support material was partly cleared I tested the light-pipe effect by shining a flashlight up through the bottom of one of the models. Light shone brightly through the transparent layers!


Here's a quick clip showing how it looks on an animated light table, illuminated from below. There's probably enough volume to fit an LED and button cell battery entirely within each model.