Sunday, March 27, 2011

Another test in leftover build volume


I've been admiring the data for Chylld's Vica Illusion Sculpture but I've been reluctant to build it because I would want to build it in a horizontal orientation, and I admit I'm unsure about arranging peeling cuts. On the one hand I could play safe by arranging peeling cuts to isolate each part of the sculpture, but so many isolated zones could result in a lot of unnecessary work to clean away the supports. Did I really want to build a throwaway model just to determine how many peeling cuts are necessary?

There was a small empty volume in the build envelope for an unrelated model, so I decided to build a scaled-down version of the Vica sculpture just to test it. This is essentially a "free" model so I ambitiously tried the simplest peeling cut layout I could think of, dividing the model into only 4 zones, of which 2 were exterior regions that would be peeled away normally.


The 2 exterior regions peeled away effortlessly while cleaning up the principal model, leaving the Vica sculpture embedded in a small cocoon of its own. The top surface shows the outlines of the remaining two zones that need to be peeled away.


It went surprisingly well, so I'm glad I aimed for such simple layout. The only issue was a region near the center of the model, where a handful of layers needed to be peeled from the topside of one part of the sculpture while the same layer extended to the underside of the other part of the sculpture. A few strips of material had to be loosened and tucked (or pulled) through an opening in the sculpture.
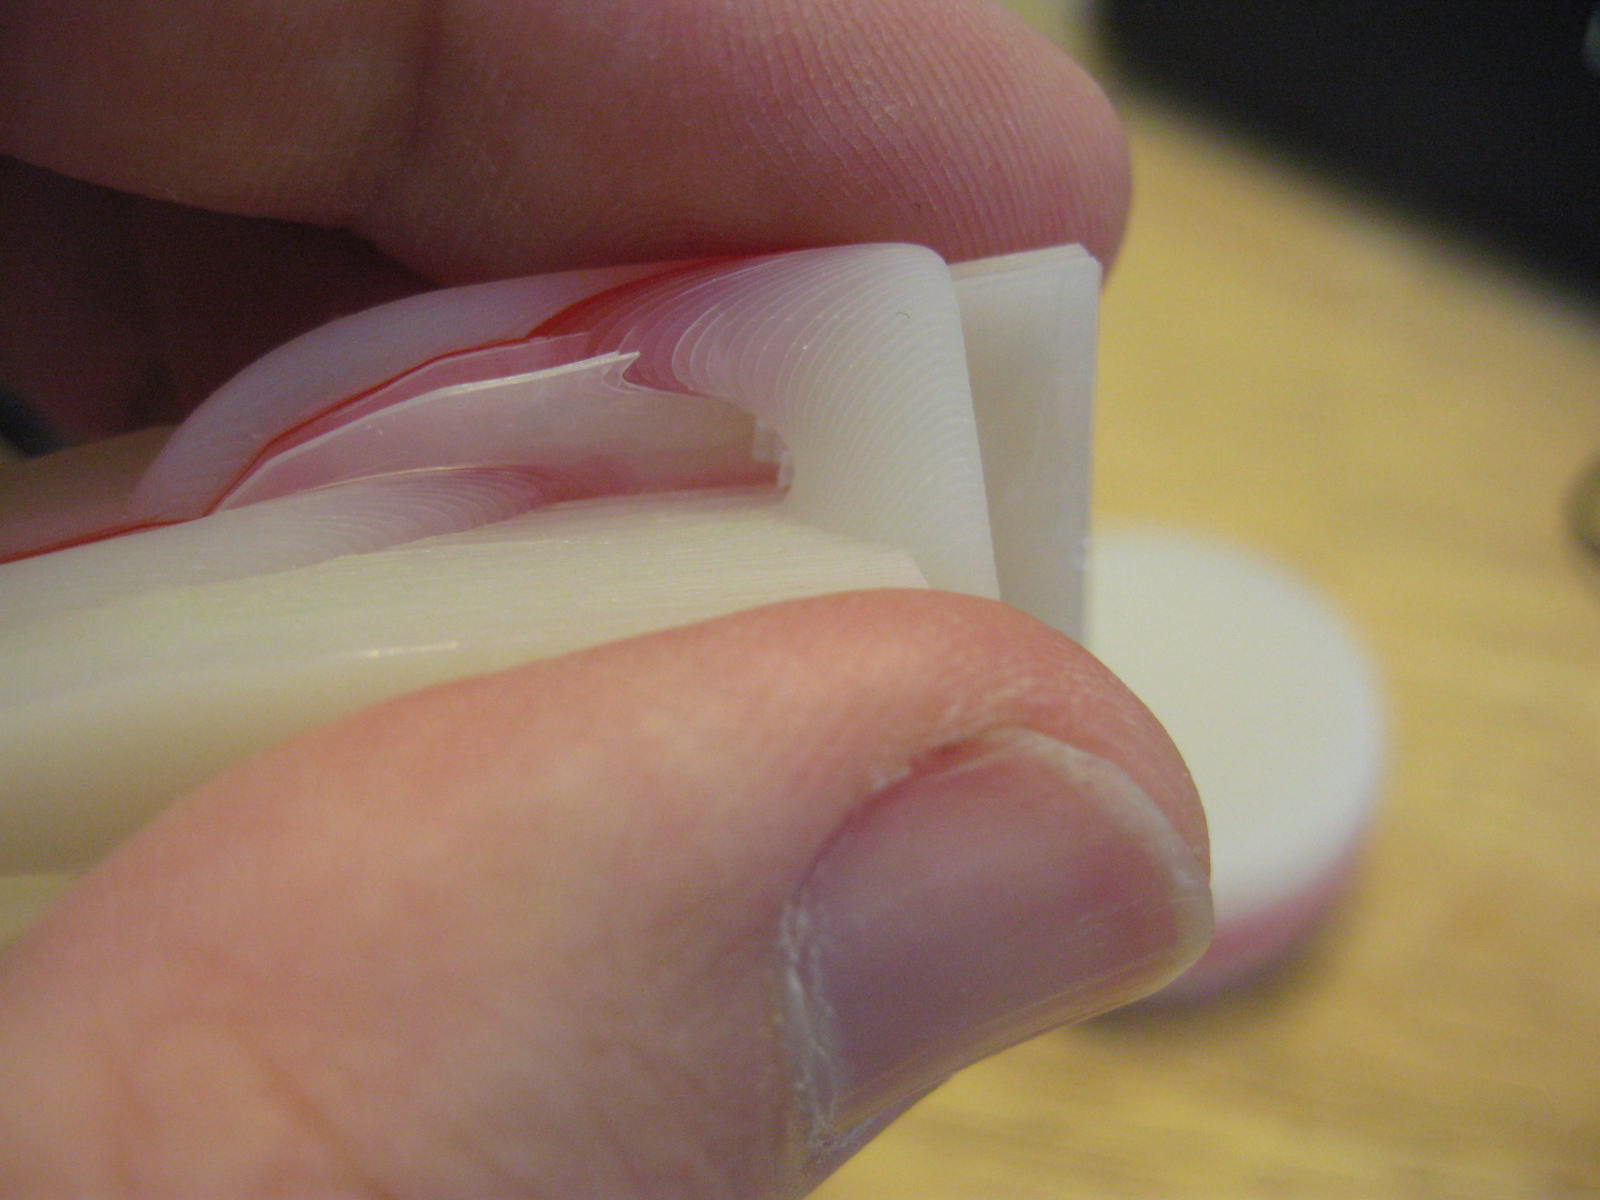

That issue could be remedied on future builds by adding an additional peeling cut (arrow) to separate the support layers near the middle of the model. It doesn't need to run the full height of the model because the problem only affected the innermost layers.


Despite that one peeling problem, and the model's thin structure, the model held together very well because the last region to be peeled formed a nice keel-shaped backbone that reinforced the model while I was clearing the exterior sections. This material peeled away effortlessly because it wasn't entangled with the rest of the model.


So the downscaled model emerged intact and attractive. Even at this reduced size the walls were thicker than 3mm, which puts the model within the SD300's optimal safe-build range. There's exactly 1 layer of red material through the model's exact center, so the red marks indicate where the sculpture's structure passes through its midpoint; a cool bonus feature!

Monday, March 21, 2011

Bradley's iPhone 4 Case Mod

Before I got my own 3D printer I always liked doing business with Bradley Rigdon at printo3d.com because he was always happy to try experimental ideas, so long as they were reasonable. For example in 2008 he shared a video of a Rubik-style cube that was built already-assembled on a Dimension SST 1200es in collaboration with another puzzle designer.

A longtime supporter of 3D printing in general, Bradley was lucky enough to get his original iPhone case built in Desktop Factory's unique additive process before they ceased development.

I recently built Bradley's updated iPhone 4 case on the SD300.


The new case has tiny letters embossed on the inside, so small that I couldn't remove the plastic inside. But the cuts were sufficiently clear and legible that it wasn't really necessary.


I installed a new XY cutting knife at the start of the build, but it broke part way through so I reinstalled the old knife to finish the model. This is the first time I'd seen a new knife fail so quickly, so I hope it was just a freak accident.

Regardless, it offered a rare opportunity to compare the cutting quality of a new knife to a worn one. On the model at left you can see a slight transition in sidewall texture where the knife was replaced. The new knife produced walls with a clean, lustrious texture while the old knife had a slightly frosty texture.


The finished model has a fold-out kickstand and tripod mount.


Bradley ambitiously wanted to peel the supports himself making use of his experence with Dimension's BST break-away supports, so I give him this video documenting how I'd cleaned the model. It's rather dry, but it was intended to be instructive not entertaining.

Sunday, March 13, 2011

Twirlicue prototype

On Thursday I learned Shapeways has permanently added solid silver to their material choices. Plenty of service bureaus offer precious metals, but Shapeways makes it so hassle-free that I wanted to devise something new just to exploit their new capability.


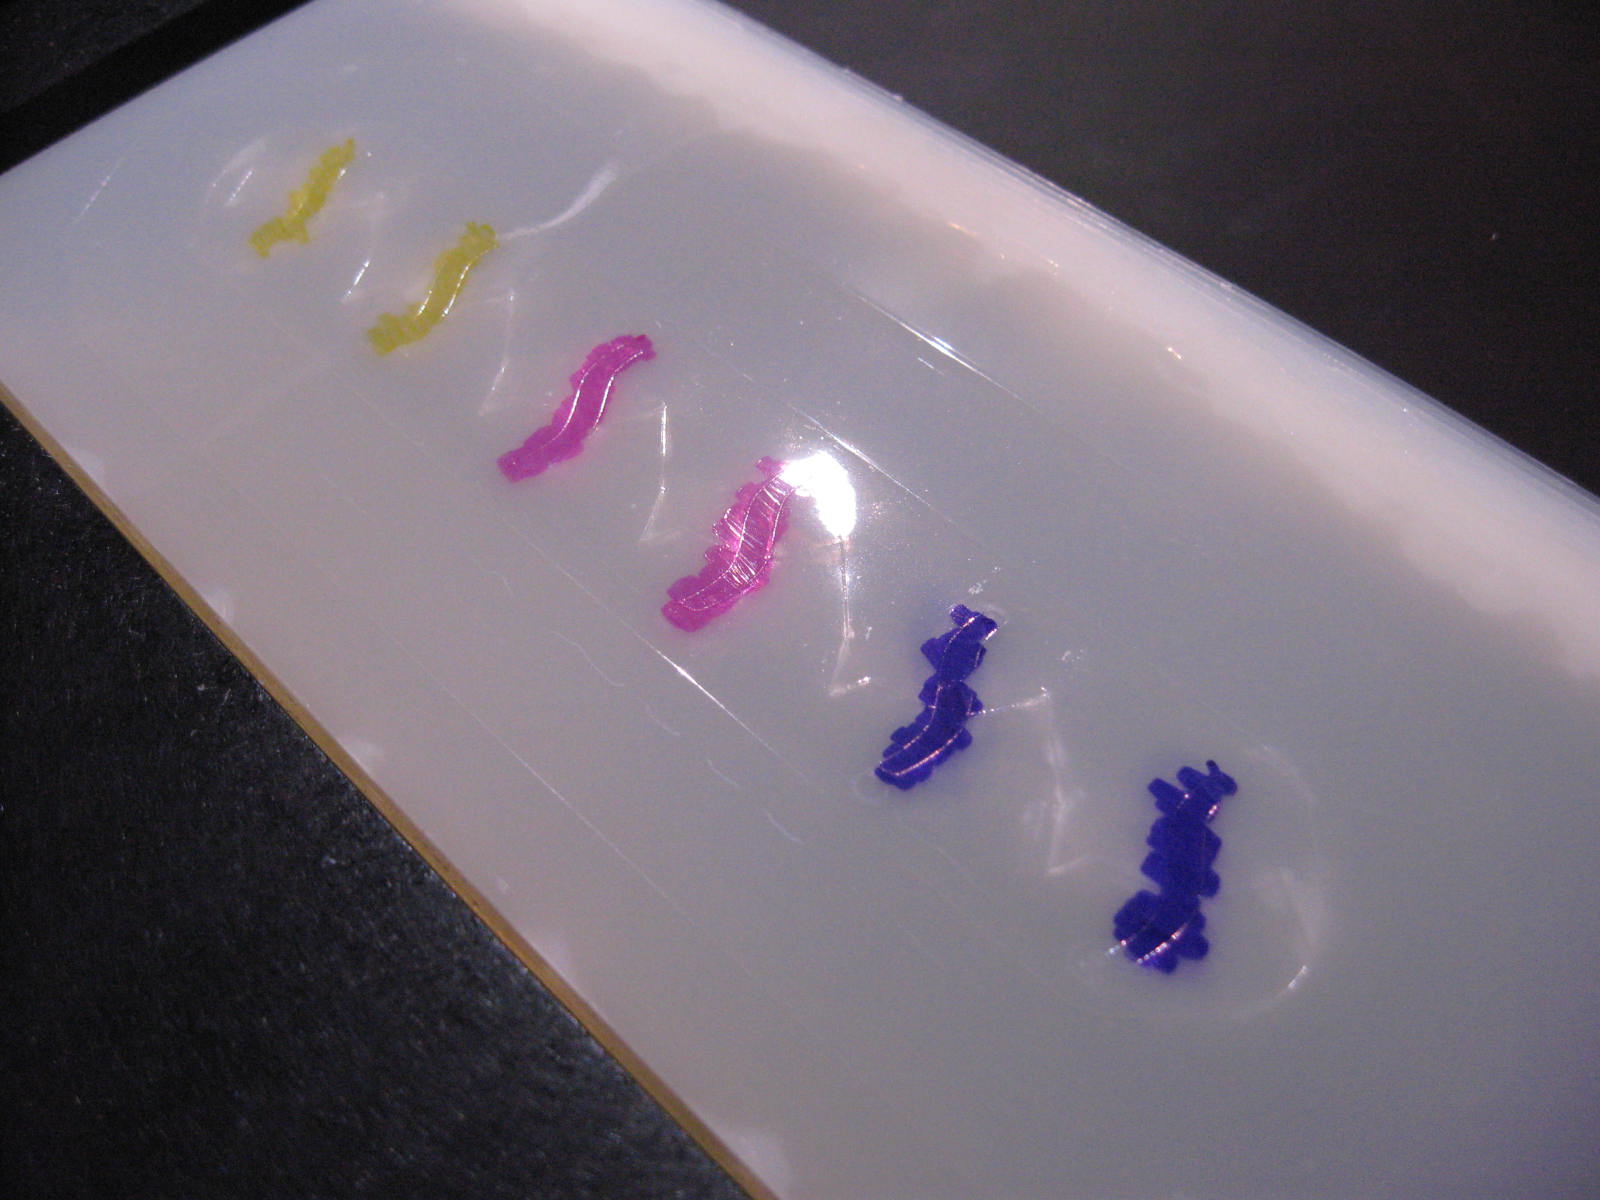
I designed a twirly shape that resembles a twisted potato chip, which is intended to be both a puzzle and a pendant. I built test models on the SD300 before sending it off to Shapeways. Just experimenting, I tinted the models by applying permanent markers to the exposed surface partway through the build process.


Here are the colored markers beside the finished parts. A visual illusion makes it seem as though the colors 'bleed' through the layers, but that's just an optical behavior of the transparent material.


I designed the models to be exceedingly thin because silver is such an expensive material, so these test models are also very thin. Consequently a piece broke away from one of the models when I was cleaning it.


The 'puzzle' is to assemble two pieces as shown here, which will allow them to be strung onto a necklace chain. The chain is a 1mm Sterling Silver box-link chain.


Here's another view showing how tiny and thin the test parts are compared to a US one-cent coin. I don't ordinarily build such thin parts on the SD300 because they require a huge investment of extra attention to remove the supports. It took at least an extra hour to clean these six parts, and I broke one.

Monday, March 7, 2011

Flexible Snake from Thingiverse


Sometimes it's exciting to build models like this Long Snake by Zomboe from Thingiverse, just to see how they adapt to the SD300's unusual material properties. This one was particularly easy to lay out on the build table with a single peeling cut running down the 'backbone' of each model.


I switched colors during the build to give the snake contrasting stripes.

After building, leftover support material tended to cling inside all the narrow slots so it required a little extra force to tear it free. It went quickly, but I had to pick a few stray pieces out of the cavities afterward.


Each snake has a flexible spine consisting of a 0.6mm wall running the length of the model. The concept could probably be applied to other arbitrary solids to make them springy and flexible.

Friday, February 25, 2011

Adding color between layers

The SD300 doesn't currently offer green material, so someone recently asked how I made the green marble I pictured in previous post in November. I had been experimenting with applying color during the build, a technique I recently repeated to produce three variously-colored marbles during a single build.


I stopped the SD300 about half way through building a batch of marbles, and applied colored markers to the interior of the models where the next layer was about to be welded on.


The ink was applied after the machine and finished applying Anti-Glue, but immediately before it ironed the next sheet. This timing ensures the machine won't come into contact with the ink, thereby protecting the cutting knife and Anti-Glue pens from contamination. My SDPause utility stops the machine at the right time.


Even though they've only been tinted only between two layers, the finished parts vibrantly exude color due to the translucent behavior of the material. That's all just a lighting effect: ink didn't (and couldn't) bleed between layers.

Wednesday, February 23, 2011

Better Cleaning with Booze

The SD300 builds each model atop a re-usable magnetic pad, which clings to the build platform. Each model starts by 'gluing' a foundation layer of PVC to the magnetic pad; plastic residues eventually accumulate until the magnet has to be replaced. Luckily it's really inexpensive.

Solido encourages regular cleaning of the magnetic pad with "an alcohol based cleaner." I had initially tried isopropyl rubbing alcohol. At 91% strength the alcohol evaporated too quickly to be useful, but at 71% strength it was only modestly effective. I tried cleaning with some grain alcohol I'd bought to remove wax from some work clothes and discovered it worked much better than isopropyl. Ethyl rubbing alcohol worked better still!


Each build leaves a bit of residue on the magnet, as shown here. This magnet has been used over two dozen times, but this tiny bit of residue is from only the last build because I've been cleaning it after every build.


It's effortless to clean the magnet after every build because I keep it in a mist-spray bottle. One disadvantage of Ethyl Rubbing Alcohol is an offensive odor imparted by the USP-mandated traces of acetone and ketone, presumably to prevent anyone from drinking it. (Blech!) But these additives might account for its excellent solvency.


After spraying with alcohol I clean the magnet with a microfiber cloth, which seems to be more-effective than paper towels. The whole cleaning job takes less than 20 seconds because I keep the cleaner and cloth handy, and it's a worthwhile habit.


Here are four used build magnets, showing how the surface of each one held up better as I learned better cleaning habits. The oldest one, at left, has white areas where models stuck so badly they started to pull the surface apart. Each magnet lasted longer than the last, but eventually they need to be replaced because the surface eventually loses its nonstick 'release' capability even if it's kept clean.

Monday, February 14, 2011

Light pipes via transparency

Inverting some previous builds I've been embedding a transparent band within opaque parts, such as these Puzzle Sphere pieces. The transparent band can act as a light pipe. There's another picture here of the assembled puzzle.


Similarly I built a batch of various Marble puzzles with embedded clear bands.


Here's one piece on a light table, showing how the clear band transmits light.


When two pieces are assembled into a Marble, the clear band in one piece transmits light through the other.


Here's an unrelated part I happened to build at the same time. It's a purely mechanical part, but it also includes a transparent band because the SD300 was building it with the same materials as the Marbles. The color-change doesn't affect the strength of the part.

Sunday, February 6, 2011

Diamond by Bre Pettis

Yesterday Bre Pettis shared a simple diamond shaped STL.

I'm working on a puzzle-themed pendant for holding gems, so I build Bre's diamond for reference.


Although it doesn't sparkle like a real gem, the transparency and internal angles catch the light very attractively on a light table.


Here's a picture of it beside several of my test models for the gem pendant.

Sunday, January 30, 2011

SlideTab in 3D

In January, Chris K. Palmer shared on Thingiverse specially-developed tabs to enable paper templates to be folded and joined together into 3D objects. It's also described at Shadowfolds.com. (I've previously featured a selection of his Sphericon models.)

Could the concept be translated into 3D models representing the same flat surfaces with slots, tabs, and hinges? At the very least, could it be made compatible with SLS?


I started my efforts by adapting the flat squares that can be assembled into a cube. It eventually worked, but only after I'd reduced the maximum wall thickness to 0.6mm. The hinged tabs required thin spots less than 0.2mm thick, too thin for reliable production by SLS.


Next I adapted the triangle models, which could be assembled into a tetrahedron (pyramid), an octahedron, or an icosahedron. But these required excessively-thin walls, like the cube, so the STLs aren't very share-able.


His "hat" models required even greater flexibility, and hence even thinner walls. It takes a lot of flexing to interlock the tabs.


Here's a partly-assembled Rabbi's Hat model.


It's not very dignified, is it?


So I didn't really meet my goal. The STL files are buildable in LOM because it can exploit the inherent strength of the unbroken source material, but the models aren't portable to other 3D printing processes. An SLS machine could build the individual parts (with careful handling) but I doubt they could be assembled.

Tuesday, January 18, 2011

Bacteriophage by LMDM

Here's an excellent work by someone else:

The Laboratório de Material Didático Multimídia encourages the use of multimedia to promote science education in Brazil, particularly materials sciences. In 2010 they acquired equipment for building solid models including CNC mills, RapMan (from BitsFromBytes), and a Solido SD300 Pro.

Illustrated here is a bacteriophage they assembled on their SD300, using source data created in Google Sketchup!


The model was built as a flat sheet only 5 layers thick, yielding parts that are then folded and glued together.


Consistent with LMDM's philosophy, they produced an animated video that graphically shows viewers how to assemble the bacteriophage model.


Naturally they've posted a YouTube video showing the whole process of building the model, the assembly animation, and the finished model.

Sunday, January 16, 2011

Multi-color 3D printing video

I posted an HD video that illustrates multi-color builds with the SD300...

YOUTUBE: SD300 Pro Multi-color 3D Printing

The thin model in the video is an adaptation of Chris K. Palmer's Slide Tab Polygons that I'm trying to convert to STL. It's 0.5mm at its thickest point, 0.18mm at the thin hinges.

Here's a lower-resolution copy of the video in case you can't access it on YouTube...

Saturday, January 15, 2011

SDPause, a utility for pausing at specific layers

I've been building a lot of multi-color models by swapping out material kits at strategic times during the SD300 Pro's build process. The software didn't allow me to schedule when the machine would pause, so it originally required me to watch the machine carefully.


For my Rox Box model, I built the model upside down starting with the transparent layers first. Once the machine had finished building the transparent 'window' I swapped in the white material and let the machine build the rest of the model. That was simple because I only had to switch materials once.


But Oskar's Cookey Tribute puzzle was over 600 layers thick, and it took almost 30 hours to build because I was building multiple models at the same time. The model entailed multiple color-transitions, so I doubted I would be able to manually intervene at all the right times. I needed something automatic!


So I created a computer program SDPause that watches the SD300's build progress and automatically pauses whenever it reaches the layer entered in the box. That ensures the machine will pause whenever the model requires a different color material. Even if I'm not home, it will pause and wait for me to change the material and manually resume.


Email me if you want a copy of SDPause; my contact info is listed in my profile. SDPause should work with the original SD300, SD300 Pro, and Invision LD.

Some things I've learned about switching material kits:
  • I generally change the glue cartridge with the PVC roll so the materials will be consumed at a predictable rate. This also ensures the installed cartridge always has sufficient glue for whatever PVC roll is installed.
  • I generally don't change the Anti-glue cartridge and pens. Instead I just replace the Anti-glue cartridge when the default material kit needs replacement, or if support material doesn't peel away easily. The machine won't suddenly run out of Anti-glue, unlike the main glue supply.

Thursday, January 6, 2011

Building a custom packing insert


I wanted to ship the parts from my previous Torus project, and they fit very neatly into a small flat-rate shipping box. But I was worried adjacent pieces might slip under each other if the box was bumped, since they're slightly wedge shaped. That could cause them to puncture the container.


So I designed a thin, hinged packing spacer and built it on the SD300. It's less than a millimeter thick, so it barely used any material.


The spacer emerged from the printer in a flat shape, but easily unfolded to form two channels would would keep the parts from overlapping during shipping.


The spacer divided the parts perfectly without occupying any space in the box. I'll probably build custom packing material like this for future shipments, since the material is thin, flexible, and strong in this format.