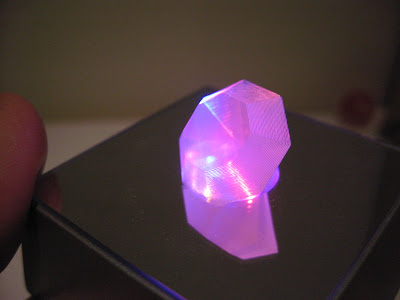
The SD300 doesn't currently offer green material, so someone recently asked how I made the green marble I pictured in previous post in November. I had been experimenting with applying color during the build, a technique I recently repeated to produce three variously-colored marbles during a single build.
I stopped the SD300 about half way through building a batch of marbles, and applied colored markers to the interior of the models where the next layer was about to be welded on.
The ink was applied after the machine and finished applying Anti-Glue, but immediately before it ironed the next sheet. This timing ensures the machine won't come into contact with the ink, thereby protecting the cutting knife and Anti-Glue pens from contamination. My SDPause utility stops the machine at the right time.
Even though they've only been tinted only between two layers, the finished parts vibrantly exude color due to the translucent behavior of the material. That's all just a lighting effect: ink didn't (and couldn't) bleed between layers.
Friday, February 25, 2011
Wednesday, February 23, 2011
Better Cleaning with Booze
The SD300 builds each model atop a re-usable magnetic pad, which clings to the build platform. Each model starts by 'gluing' a foundation layer of PVC to the magnetic pad; plastic residues eventually accumulate until the magnet has to be replaced. Luckily it's really inexpensive.
Solido encourages regular cleaning of the magnetic pad with "an alcohol based cleaner." I had initially tried isopropyl rubbing alcohol. At 91% strength the alcohol evaporated too quickly to be useful, but at 71% strength it was only modestly effective. I tried cleaning with some grain alcohol I'd bought to remove wax from some work clothes and discovered it worked much better than isopropyl. Ethyl rubbing alcohol worked better still!
Each build leaves a bit of residue on the magnet, as shown here. This magnet has been used over two dozen times, but this tiny bit of residue is from only the last build because I've been cleaning it after every build.
It's effortless to clean the magnet after every build because I keep it in a mist-spray bottle. One disadvantage of Ethyl Rubbing Alcohol is an offensive odor imparted by the USP-mandated traces of acetone and ketone, presumably to prevent anyone from drinking it. (Blech!) But these additives might account for its excellent solvency.
After spraying with alcohol I clean the magnet with a microfiber cloth, which seems to be more-effective than paper towels. The whole cleaning job takes less than 20 seconds because I keep the cleaner and cloth handy, and it's a worthwhile habit.
Here are four used build magnets, showing how the surface of each one held up better as I learned better cleaning habits. The oldest one, at left, has white areas where models stuck so badly they started to pull the surface apart. Each magnet lasted longer than the last, but eventually they need to be replaced because the surface eventually loses its nonstick 'release' capability even if it's kept clean.
Monday, February 14, 2011
Light pipes via transparency
Inverting some previous builds I've been embedding a transparent band within opaque parts, such as these Puzzle Sphere pieces. The transparent band can act as a light pipe. There's another picture here of the assembled puzzle.
Similarly I built a batch of various Marble puzzles with embedded clear bands.
Here's one piece on a light table, showing how the clear band transmits light.
When two pieces are assembled into a Marble, the clear band in one piece transmits light through the other.
Here's an unrelated part I happened to build at the same time. It's a purely mechanical part, but it also includes a transparent band because the SD300 was building it with the same materials as the Marbles. The color-change doesn't affect the strength of the part.
Sunday, February 6, 2011
Diamond by Bre Pettis
Yesterday Bre Pettis shared a simple diamond shaped STL.
I'm working on a puzzle-themed pendant for holding gems, so I build Bre's diamond for reference.
Although it doesn't sparkle like a real gem, the transparency and internal angles catch the light very attractively on a light table.
Here's a picture of it beside several of my test models for the gem pendant.
Subscribe to:
Posts (Atom)