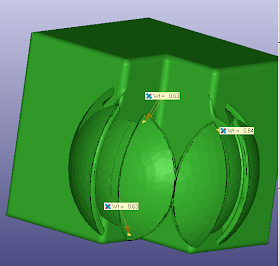
I'd tried to avoid thin walls in my earliest designs for the SD300, but occasionally built thinner walls by chance or miscalculation. Some worked, some didn't, but I always learned something new. So I got permission to build the model, fully aware I was going to have problem with it.

Unsurprisingly, lots of really thin areas broke away while removing the supports. I managed to preserve some walls as thin as 0.5mm by peeling the support material away slowly, one layer at a time. Some undercuts were so narrow I couldn't even reach into them with my curved forceps.

Still, the model emerged sufficiently intact for examination. The channel walls were so thin I could barely get a fingernail inside, and they were noticeably flexible. I dipped the parts in Weld-On 2007, which immensely strengthened the surviving structures.

Surprisingly, the parts can be assembled...barely! The tolerances were inadequate, but they just barely functioned because the channel wall flexes just enough to compensate.

The design doesn't make provision for installing all four parts, so I couldn't assemble the whole puzzle. But it's impressive that it worked at all.

These parts aren't practical due to the overly-tight tolerances, but the model confirms the designer's concept nevertheless. But I certainly wouldn't try to build such thin walls routinely. A comparable model might take 10 minutes to clean away the supports, while this took almost 2 hours. If it hadn't been for the Weld-On dip the parts probably would've broken during testing.
But it shows that the user can venture outside of "good practices" at his discretion. The SD300 will attempt to build any geometry it can process, even if it's not practical. It's the user's choice.
No comments:
Post a Comment