In the 1970s Richard Cooksey invented a cylindrical maze puzzle, which underwent some development by Pentangle Puzzles & Games but didn't ultimately become a commercial product. Puzzle inventor Oskar van Deventer recently adapted the puzzle and made it available through Shapeways as Cooksey Maze.
Oskar also designed a series of six Cooksey Tribute puzzles, each a different variation on the basic concept.
The ring has two pins that ride in the grooves on the cylinder; it's shaped so the user can choose one pin to lift out of the grooves, permitting the user to switch from one side of the 'maze' to the other. The ring is attractively cut with large openings for the user to look through, but the opaque material undesirably blocks the view of the maze. Oskar said he would have preferred to make the rings transparent, so I offered to try building a set on the SD300.
I built a complete set of six rings, corresponding to the six variants of Cooksey Trubute, using the amber-transparent material. The 3-4mm thick sidewalls aren't crystal clear, but they're sufficiently transparent to give a clear view of objects inside.
Sure enough! The transparent rings give a clear enough view to permit the puzzle to be explored and solved pleasantly.
M. Oskar van Deventer is offering a free Cooksey Maze to anyone who can put him into contact with Mr. Richard Cooksey.
The Solido SD300 Pro is a unique 3D printer that builds solid parts out of layers of PVC plastic film. I created this blog because I don't think there's enough information about it on the Internet. I intend to explore, review, and exploit its unique & quirky features here.
Saturday, August 28, 2010
Sunday, August 22, 2010
Multi-color build
I've used clear & opaque material in the same build, so now I tried building with two colors in the same build. Part way through this build I replaced the white material kit with black, resulting in a model block that resembles an Oreo cookie.
The finished parts show a nice, distinct transition from one color to the other.
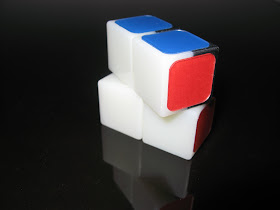
I assembled the parts into a puzzle and added colored tiles. It looks a bit bizarre, but it shows how two colors can be used together.
The finished parts show a nice, distinct transition from one color to the other.
I assembled the parts into a puzzle and added colored tiles. It looks a bit bizarre, but it shows how two colors can be used together.
Sunday, August 15, 2010
Cubic trisections
A few days ago I explored many novel ways to trisect a cube into three identical parts. Could they be adapted into a puzzle? To find out I printed three samples, each using different parameters.
Each cube is made of 3 identical parts, which slide together (or apart) with a novel twisting action.
Here are the individual pieces of one trisected cube.
Because the model included some spots as thin as 0.3 mm I chose the build orientation carefully to exploit the SD300's ability to build thin layers in the Z axis.
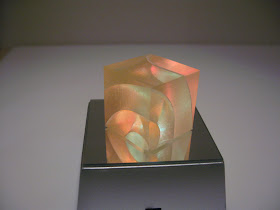
Light reflects and refracts spectacularly inside each model. I don't regard it as a finished puzzle, but the SD300 encouraged me to try out an idea I might have ignored.
Wednesday, August 4, 2010
Rox Box: Clear and opaque in the same parts
I built this puzzle box for a collector named Roxanne, and incorporated her nickname "Rox" into the puzzle itself. The box holds the gemstones using the gem holders I built earlier, so I called it the "Rox Box."
The gem holders slide into a plastic insert, which corkscrews into the middle of the puzzle box. Rox's nickname is carved into the walls, which creates a maze the lid has to be threaded through to open the box. This premise was inspired by Teifenbacher's A-Mazing Box at Thingiverse.
It's 3D printed with a combination of opaque materials and clear material to form windows, so the gems are visible when the box is closed. A ruby is visible through the top, engraved with a Rubik's Cube.
A sapphire is visible through the bottom of the box.
To build opaque parts with clear windows I switched between transparent and opaque material while the SD300 was building, which resulted in a seamless transition between the two. Thus the clear windows are integral, rather than being assembled separately.
This was my first attempt to combine two materials, and it worked perfectly on my first try! In this instance I simply arranged the parts so the window would be built first, and started building with clear material. When it had built to a height of 2mm (the thickness of the windows) I selected "Unfeed media" on the front panel, swapped-in the opaque white material, and let it continue building.