Users of FDM sometimes apply solvents like acetone or MEKP to ABS models to improve the finish, so I tried to adapted that technique to the SD300. Obviously I couldn't use the same solvents on PVC, so I selected IPS Weld-On 2007. It's 100% solvent, leaving no residual cement. (Solido's own solvent "glue" might also be suitable, but I didn't know its composition so I started with Weld-On.)
The results were spectacular!
I built two copies of a puzzle that has a lot of spherical surfaces. The puzzle at left has been dipped in Weld-On 2007 for ten seconds. It looks about the same in the picture, but the sidewalls are noticeably smoother. The pieces for the solvent-dipped puzzle slide together more pleasantly.
Solvent-dipping made the sidewalls much more transparent, too. The printed document shows through the part at left, with the sidewalls acting like a primitive lens. In contrast, the sidewalls of the un-dipped part (right) are merely translucent.
A solvent-dip also improved parts' mechanical properties. Last week I built a barrel puzzle whose parts fit too tightly to operate the puzzle without damaging it. After I dipped the parts, the puzzle turns smoothly enough to be practical for actual use. As a bonus, the solvent sealed and strengthened the curved internal contours. And it's noticeably more transparent; the view below is looking entirely through side walls!
I imagine there's room for further experimentation and refinement. Regardless, solvent finishing SD 300 parts with Weld-On 2007 is clearly a valuable post-processing technique. Tell your friends!
The Solido SD300 Pro is a unique 3D printer that builds solid parts out of layers of PVC plastic film. I created this blog because I don't think there's enough information about it on the Internet. I intend to explore, review, and exploit its unique & quirky features here.
Sunday, March 28, 2010
Friday, March 26, 2010
Small holes & peeling cuts
When dealing with vertical holes on the SD300, it's common wisdom to avoid dividing the hole with peeling cuts. Keeping the interior intact optimizes the Z-folds for peeling away the waste material after the part is cut. At least that's how it works for larger holes.
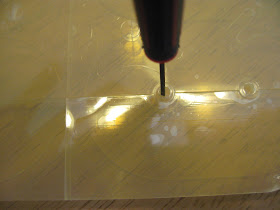
But I've found the Z folds aren't very effective for clearing holes smaller than about 1cm, and very small holes simply can't be 'peeled' at all. Small holes have to be cleared by mechanically scraping the waste material out of the holes. In that situation I found it helpful run a peeling cut through the interior of the hole, as shown here.
It worked best to clear holes before peeling the material around the part. The peeling cut through the center of the hole provides an edge that can be scraped without touching or damaging the surrounding part. When I twirled a fine-point jeweler's screwdriver on the peeling cut, it worked its way into the cut and loosened the waste material. (The pictured hole is about 3.5mm across.)
This technique proved doubly-useful with blind holes: Firstly, the twirling screwdriver loosened the waste material without damaging the bottom of the hole. Secondly, the cut provided a visual reminder when there was still waste material in the hole. When the cut line disappeared, the hole was clean.
Monday, March 22, 2010
Process comparison: Invision HR
I had previously built parts for the Junior Barrel in blue VisiJet HR200 material on a 3D Systems Invision HR (succeeded by the Projet HD). Here's a closeup comparison with the same parts built on my Solido SD300 Pro using translucent/transparent amber material. (Both
Both machines used translucent material, but both offer opaque material options.
The Solido SD300 can render glossy flat surfaces by simply exposing the original surface of the PVC sheet. The Invision HR part is covered with a stubborn white wax that supported another part being built above it, the part in the next picture.
Stairstepping is visible on the angular surfaces of the SD300 part, whereas a dither-like pattern is visible on all surfaces of the Invision HR part. (Click picture to see the details close-up.)
Surprisingly, the SD300 bested the Invision HR for these exterior parts. The SD300 parts exhibit a consistent, satin-like sheen. The Invision HR had built these parts standing on their ends so half the curve was built facing down and half was built facing up, resulting in a distracting change in texture.
The Invision HR's wax support material is hard to remove completely. Most of it just wipes off, but there's a stubborn residue. Acetone was recommended, but that simply eliminates the greasy feel without cleaning away the white 'bloom.'
Sunday, March 21, 2010
Working Geneva Wheel
Today I built a functional Geneva-drive wheel , downloaded from here at Thingiverse. The files were shared by user PrintTo3D (Bradley Rigdon) who operates an affordable 3D service bureau. Except for one particular detail it's a perfect model for the SD300 because the flat, smooth surfaces slide nicely over each other and the 2-dimensional contours cut nicely in the SD300's XY build plane. (Click any picture for a closer view.)
The model was built within this 1"x5"x8.5" block. I didn't try to optimize the layout, so there's a lot of wasted volume above move of the parts due to the height of the tallest post. By carefully stacking the parts I think it's possible to build two whole models in the same volume of material.
The one troublesome detail is the thin posts in the center of the caps. They built okay, the post on one cap (bottom center) broke off when I was prying the model apart for this picture. No doubt it would be wise to build the caps with the post parallel to the build plane for greater strength.
Here's a closeup of the text embossed on the driving wheel. I didn't weed out the material inside the letters, but the outlines are nice and sharp.
Here's a short video showing how the Geneva drive works. When the driving wheel is turned continuously the driven wheel turns intermittently.
Saturday, March 20, 2010
First complex model: Junior Barrel Puzzle
Today I built 12 more parts for a complete mechanical puzzle. Designed by Matt Shepit, the Junior Barrel has three groups of three movable pieces that can be rotated around the center. It's sitting atop the material block in which the parts were built.
Here's how the block looked before all the support material had been peeled away. The SD300 always builds parts in a "sweet spot" away from the edges of the sheets. The support material has already been peeled out of the channel, leaving the parts embedded in a section called "The cocoon."
I made some mistakes arranging the cuts in the support material, probably because I was impatient to build more models after my first successful build. If I had instructed the machine to put cuts on either side of the post I wouldn't have been forced to carefully peel each sheet off and slide it over the post one-at-a-time like this.
Good practice dictates that you should review all the peeling cuts and adjust them to avoid unnecessary complication, but I hastily started building as soon as I saw enough cuts to free the parts. This caused the printer to waste its time leaving useless, thin layers of wasted support material on the backsides of curved surfaces. It didn't hurt the parts, but I wasted at least an hour fishing out all the bits of surplus material wedged in nooks.
The finished parts fit a bit too snugly for the puzzle to turn freely, but the puzzle is functional enough to turn all the parts...with effort!
Friday, March 19, 2010
My first parts
I just built my first part after getting the SD300 set up. It's an end-cap for Matt Shepit's Junior Barrel puzzle, which I chose because it's flat. It took about half an hour to build the two caps pictured below. I'm currently using amber material, which is quite transparent when viewed through the build-plane as shown at left. But it's merely translucent from the sides.
Here's a picture comparing the SD300 parts to ones built using a different technology. The blue parts were built by Printapart using an Invision HR. The two technologies are sufficiently precise that my new end cap snaps perfectly onto the Printapart body piece, at top.
Now I guess I'd better build the rest of the parts for a full puzzle!
Damaged consumables
One of the boxes of consumables had a peculiar dent. It wasn't crushed very deeply, but the condition of the box suggested it had been subjected to heavy pressure sometime during shipping. And there's an ominous stain below the dent.
While setting it up, I found an anti-glue cassette inside the box was distorted and cracked. Some of the masking fluid was leaking out of the cassette. This cassette is pretty stout, so it must have been crushed pretty hard! Luckily I have spares, and Solidvision promptly promised to send a replacement.
Thursday, March 18, 2010
Solido's "Test Part"
The SD300 has a built-in capability to build this test part. It's a geometric net of a pyramid. To conserve material, the walls are just 1 millimeter at the thickest point.
The V-shaped grooves form hinges so it can be folded, and there are flexible straps with tabs that hook the faces together. The straps rest in shallow grooves so they're flush with the faces they fold onto.
Once it's folded and hooked together, it forms a hollow pyramid 2-inches long on each edge. The faces are lustrous because they were aligned with the shiny surface of the PVC sheets the part was made from.
Just got my SD300 Pro
I bought my Solido SD300 Pro through an SolidWorks vendor in New England, SolidVision. It's set up (temporarily?) in my living room.
It still has the packing material in it, so it's not ready to build models yet. Hopefully it'll be up and running tomorrow. (It doesn't have an electric-medusa hairdo. That's just a floor lamp behind it.)